2.1. Initial Installation
Jump to:
No content available.
Welcome!
We are proud to introduce our NCTI premium/CRM client for Windows. The NCTI premium / CRM client is optimised for the NFON telephone system. NCTI premium / CRM for Windows has been designed to make your phone easier and more convenient to use. It can do this in a number of ways as with presence management, chat or available CRM/ERP systems and this document will show you how.
We hope you enjoy using your NCTI premium/CRM for Windows.
The CTI (Computer Telephony Integration) client uses your computer as a remote control for your desk telephone. We offer you two licence options, one with and one without CRM integration. You have the option to integrate CRM and ERP systems into the client as well.
Integrate various Customer Relationship Management (CRM) tools to the NFON telephone systems with NCTI premium/CRM for Windows. The resulting shortened work processes lead to increased productivity and efficiency at work.
This document will provide you detailed insights into installation and usage of NCTI premium/CRM to make your phone easier and more convenient to use.
A local server installation is required to use NCTI premium/CRM for Windows. The server is provided by NFON, however, not hosted by NFON. Server installation and configuration are carried out remotely by NFON.
The NCTI premium client requires the uaCSTA protocol for communication. Therefore the client is only compatible with selected devices.
| Type | Icon/Character | Description |
| NOTE
CAUTION
WARNING | NOTE: Information that is useful but not critical to the reader.
CAUTION: Tells the reader to proceed with caution.
WARNING: Stronger than CAUTION; means "don't do this" or that this step could be irreversible, e.g., result in permanent data loss. | |
| TIP |
| Useful tips that provide additional information. |
| Procedure | 1. 2. 3. | Procedures are numbered steps to perform an action, where the order of the steps is relevant. |
| Result of procedure/action | ⇒ | Indicates the result of an action//procedure. |
| Lists | • • | Used for listings and items where the order of steps is irrelevant. |
Find a quick start guide to configure and initialy operate your NCTI premium client:
Due to discontinuing the operating system Windows XP on April 8, 2014 and Windows 7 on January 14, 2020 as well as the Windows server 2003 on July 15th, Microsoft no longer grants support and updates to its users. Therefore, the NCTI premium/CRM client is no longer officially supported with Windows XP or Windows 7 or with Windows Server 2003.
Furthermore, for security reasons we highly recommend to not use NCTI premium/CRM with Windows Vista as TLS 1.2 is not available for Windows versions as Windows Vista or XP. According to the Federal Office for Information Security, TLS 1.2 is the minimum standard for the transport encryption via TLS (Transport Layer Security).
Client requirements
NCTI premium/CRM for Windows is only compatible with the following operating systems (32 and 64 bit):
- Windows 10
- Windows 11
- Windows Server 2022
The NCTI premium/CRM client works with desktop phones by the following manufacturers:
 snom
snom
Yealink
Poly
Panasonic
Server Requirements – Small Single Site
These minimum server specifications are valid for the following parameters:
- Up to 30 trunks
- Up to 500 calls per hour
- Up to 50 extensions / users
Supported Operating Systems (64-bit only):
- Windows Server 2022*
- Windows Server 2019
- Windows 10
- Windows 11*
Note: NCTI premium is not supported on a Windows server that is also configured as a Windows domain controller.
* Note: Windows 11 and Windows Server 2022 are not supported when used in conjunction with NVMe drives. For more information see here.
Minimum Hardware Requirements:
- 64-bit AMD or Intel Processor
- Minimum 4GB Memory
- 20GB free hard drive space
- Network adapter connected to a TCP/IP network (not wireless)
Also virtual environments are supported e.g. VMware or Hyper-V.
Note: A small single site server installation may co-exist with other applications on a shared server. However, if the machine experiences performance issues then a dedicated server should be used.
Server Requirements – Medium Multi Site
These minimum server specifications are valid for the following parameters:
- Up to 150 trunks across combined sites
- Up to 2000 calls per hour
- Up to 400 extensions / users
Supported Operating Systems (64-bit only):
- Windows Server 2022*
- Windows Server 2019
- Windows 10
- Windows 11*
Note: NCTI premium is not supported on a Windows server that is also configured as a Windows domain controller.
* Note: Windows 11 and Windows Server 2022 are not supported when used in conjunction with NVMe drives. For more information see here.
Minimum Hardware Requirements:
- 64-bit AMD or Intel Processor
- Minimum 4GB Memory
- 20GB free hard drive space
- Network adapter connected to a TCP/IP network (not wireless)
Virtual environments are supported e.g. VMware, Hyper-V.
Note: A dedicated server is required for medium server installations.
Server Requirements – Large Multi Site
These minimum server specifications are valid for the following parameters:
- Up to 300 trunks across combined sites
- Up to 4000 calls per hour
- Up to 1000 extensions / users
- Call history must be restricted to 14 days.
Supported Operating Systems (64-bit only) :
- Windows Server 2022*
- Windows Server 2019
- Windows 10
- Windows 11*
Note: NCTI premium is not supported on a Windows server that is also configured as a Windows domain controller.
* Note: Windows 11 and Windows Server 2022 are not supported when used in conjunction with NVMe drives. For more information see here.
Minimum Hardware Requirements:
- 64-bit AMD or Intel Processor
- Minimum 8GB Memory
- 20GB free hard drive space
- Network adapter connected to a TCP/IP network (not wireless)
For sites larger than those specified above please consult with Mondago.
Virtual environments are supported e.g. VMware, Hyper-V.
Note: A dedicated server is required for large server installations.
Microsoft Components
- .NET 4.5 Framework (required and shipped with software).
- .NET 4.8 Framework from V3.2 (required and shipped with software).
- Microsoft Visual C++ 2015-2019 Redistributable
Note: NCTI Server makes use of a lightweight embedded database.
Version
You'll find the latest version by clicking "About" and then "Version" within the administration panel.
No content available.
No content available.
Technical prerequisites for the client installation and initial startup are the following:
- An internet connection
- An IP capable phone (see compatibility)
- Your customer number, extension number and voicemail pin must be available
- The desktop phone of the extension has to be defined as the primary device in the administration portal
- uaCSTA settings for desktop phone of the extension must be activated in the administration portal
- The CTI option in the extension must be enabled with either “NCTI premium” or “NCTI premium CRM” in the administration portal
For more detailed information about system requierements, please see here.
No content available.
To install the NCTI premium server and for further information, contact our sales departement. Since the NCTI premium client is a 3rd party client, the installation has to be done locally.
Local installations are subject to a one time fee.
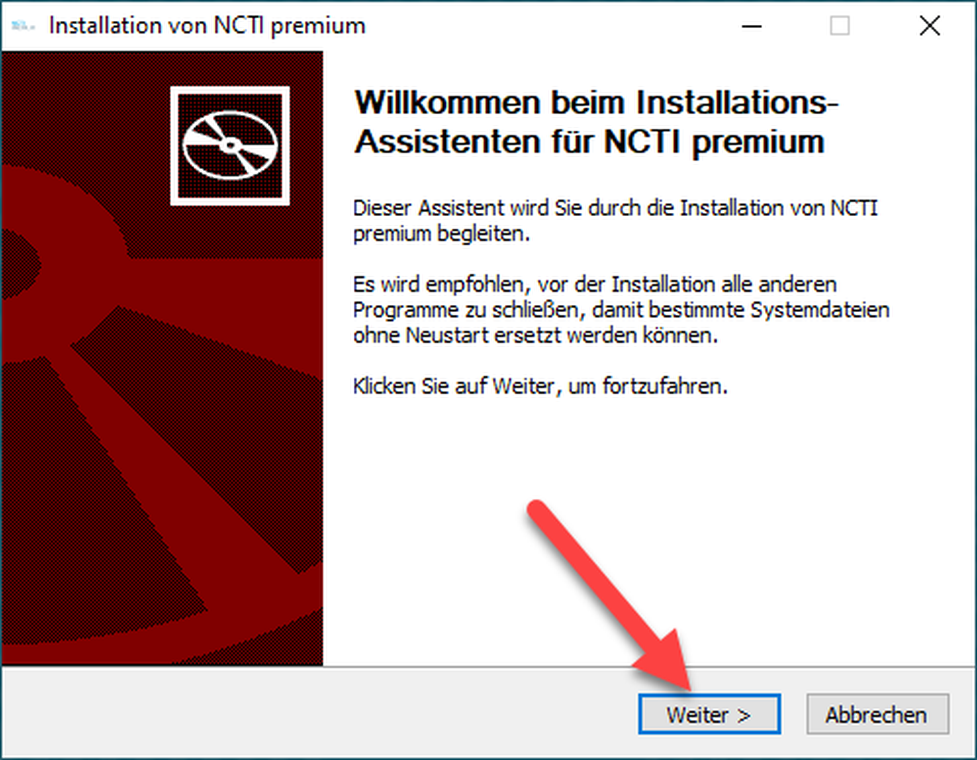
The following steps guide you through the installation of the NCTI premium client.
Start the installation process by double clicking on the setup file.
Click on Next.
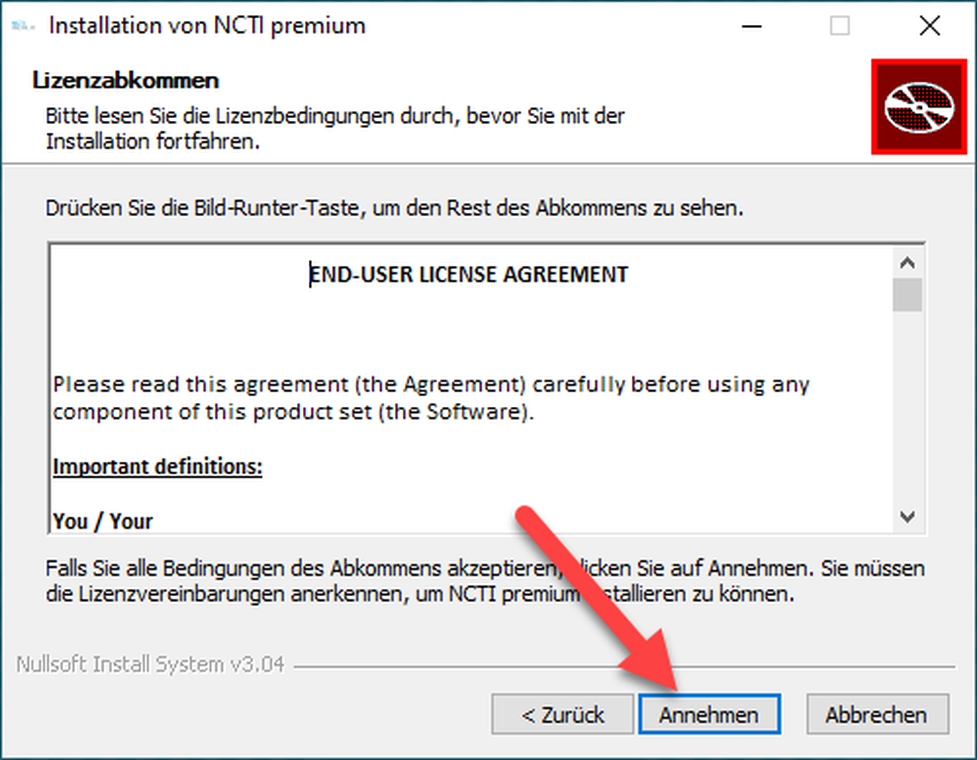
Click Accept to confirm the licence terms.
The installation can take a few minutes.
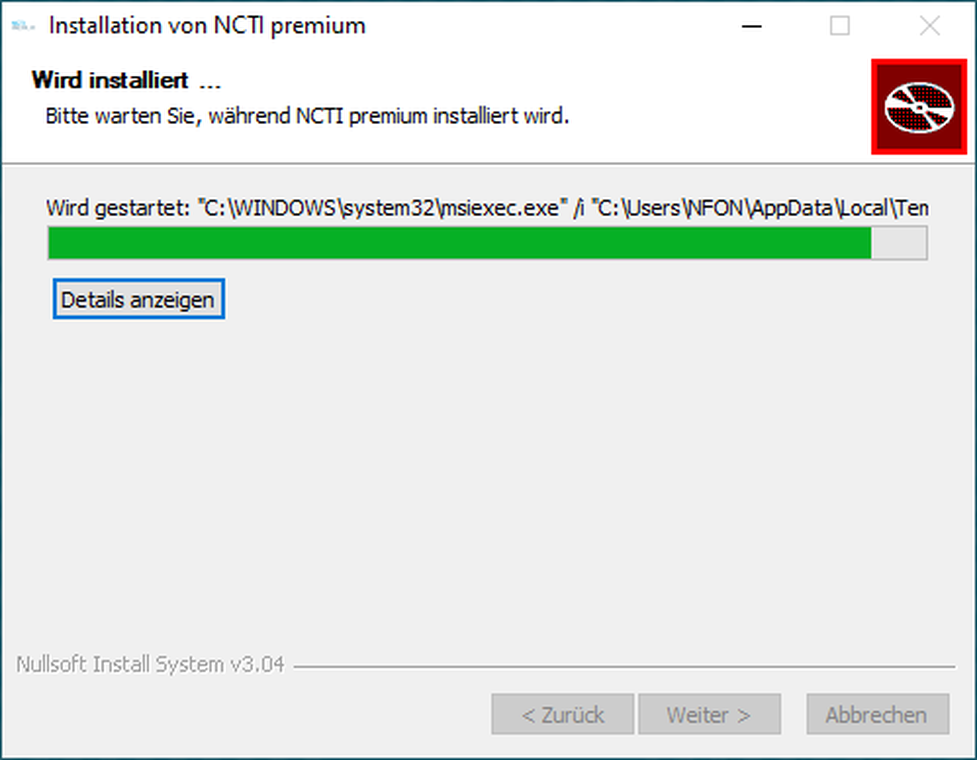
Click on Finish to complete the installation.
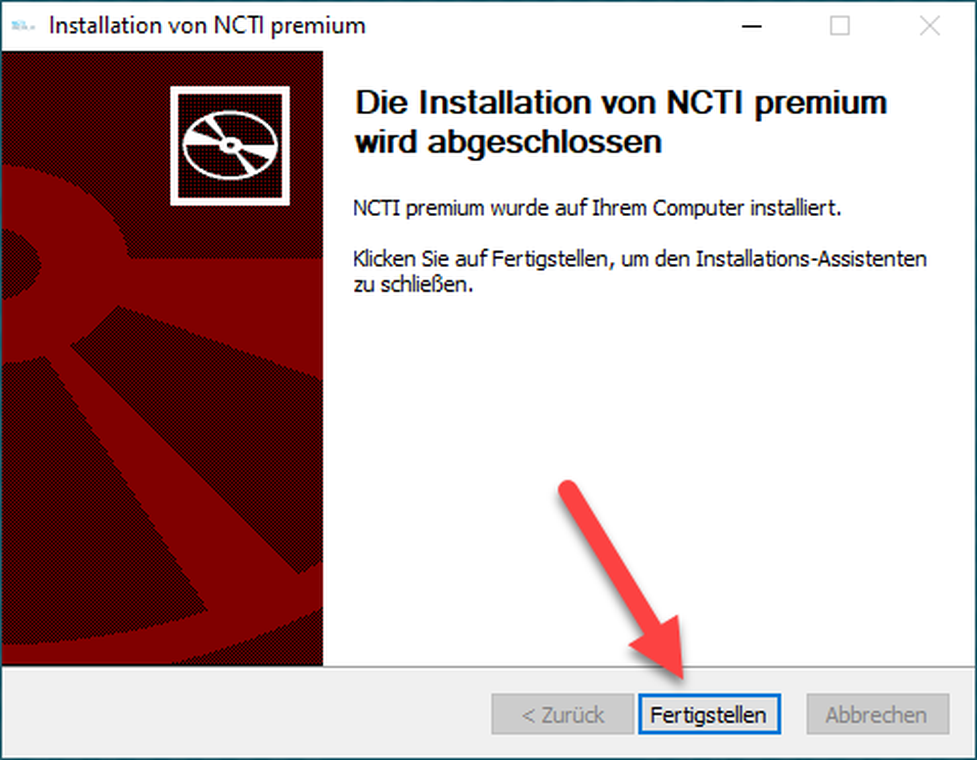
Note that the Port TCP 21050 in your firewall needs to be unlocked. Contact your system admin.
After finishing the installation process, the NCTI premium symbol shows up in the menu bar.

The grey color means that the client is not yet connected with the system telephone.
Further information on connecting the client to the telephone can be found in 2.3. Extension configuration.
The NCTI premium client is configured as such that it will be automatically started with every computer start. The successful start is indicated by a green NCTI premium icon in the menu bar.

⇒ The installation process is completed.
To configure your NCTI premium / CRM Client with your IP telephone, both have to be connected to each other. Follow these steps:
-Log in to the administration portal with your username and password.
-Click on Elements  End devices and search for your extension.
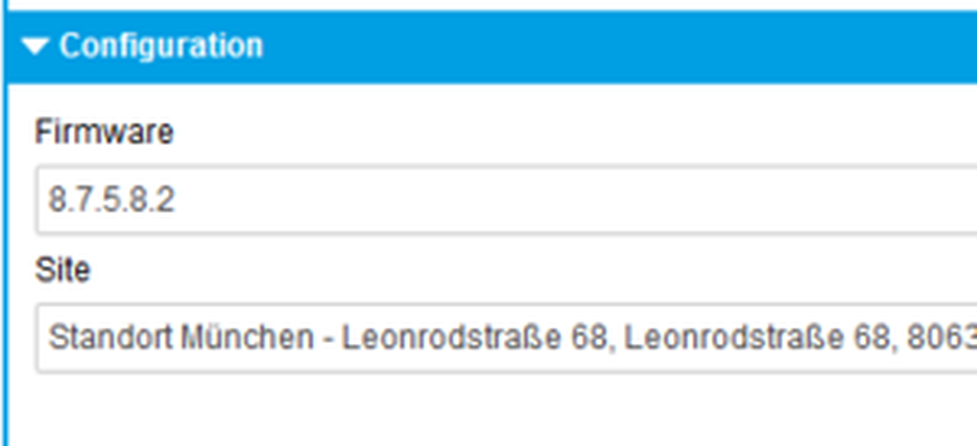
– Choose the latest firmware supported by NCTI Premium for your telephone.
– Choose the correct location. This enables the correct downloading of the data from the server. The uaCSTA settings have to be implemented in the location or directly in the end device.
If the uaCSTA settings are shown in the location, the configuration of the end device is completed.
Otherwise, please proceed as follows:
– Log in to your administration portal.
– Open the Location tab.
– Open the relevant location by double-clicking on it.
– Scroll down to the uaCSTA item
– Enter the CTI server IP address e.g. 192.168.30.145.
– Enter port 6060.
– Choose the UDP or TLS protocol.
– Should you use the TLS connection, please block port 21050 and add port 21051 to the IP address (e.g. 127.0.0.1:21051)
– Enter the password of your CTI server.
– Click on Save to save your settings.
To connect the CTI Client with your telephone, the latter must be recognised as a primary device.
After configuring the telephone, check whether the telephone is assigned to your extension as primary device.
– Go to Targets and enter your extension into the search field.
– Double click on your extension to go to the settings of your extension. Check under the phone devices section whether your device is marked as a primary device. If not, check the respective box.
– Click on Save.
⇒The settings are now permanent and the NCTI premium Client can connect with your phone.
To assign the NCTI premium / Client a valid licence, the licence has to be entered in your service portal account.
The CTI Option in the Administration / Profile folder has to be enabled. If this is not the case, contact your system admin in order to enable this function for you.

– As soon as the CTI option is enabled, log into the administration portal with your user name and password.
– Click on Targets and enter the number of your extension into the search field.
– Double click on your extension to get to the settings of your extension. Check in the configuration folder, whether a corresponding license has been selected under CTI. If not, select your client via the dropdown menu and choose whether to have CRM enabled or not.

– Click on Save.
⇒ The settings are saved and you have licenced your extension for the use of the NCTI premium/CRM client.
No content available.
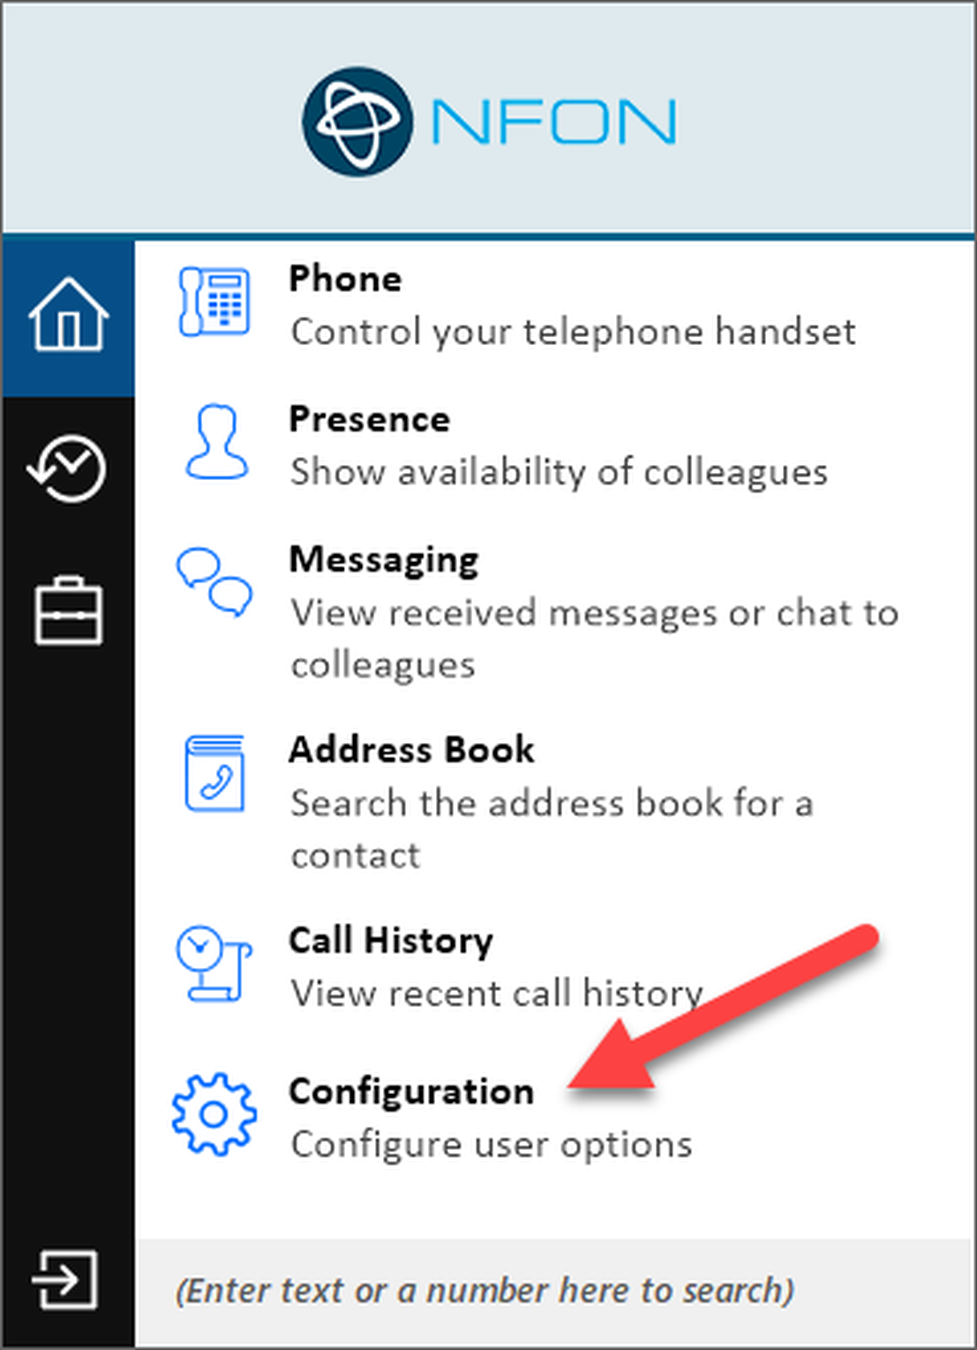
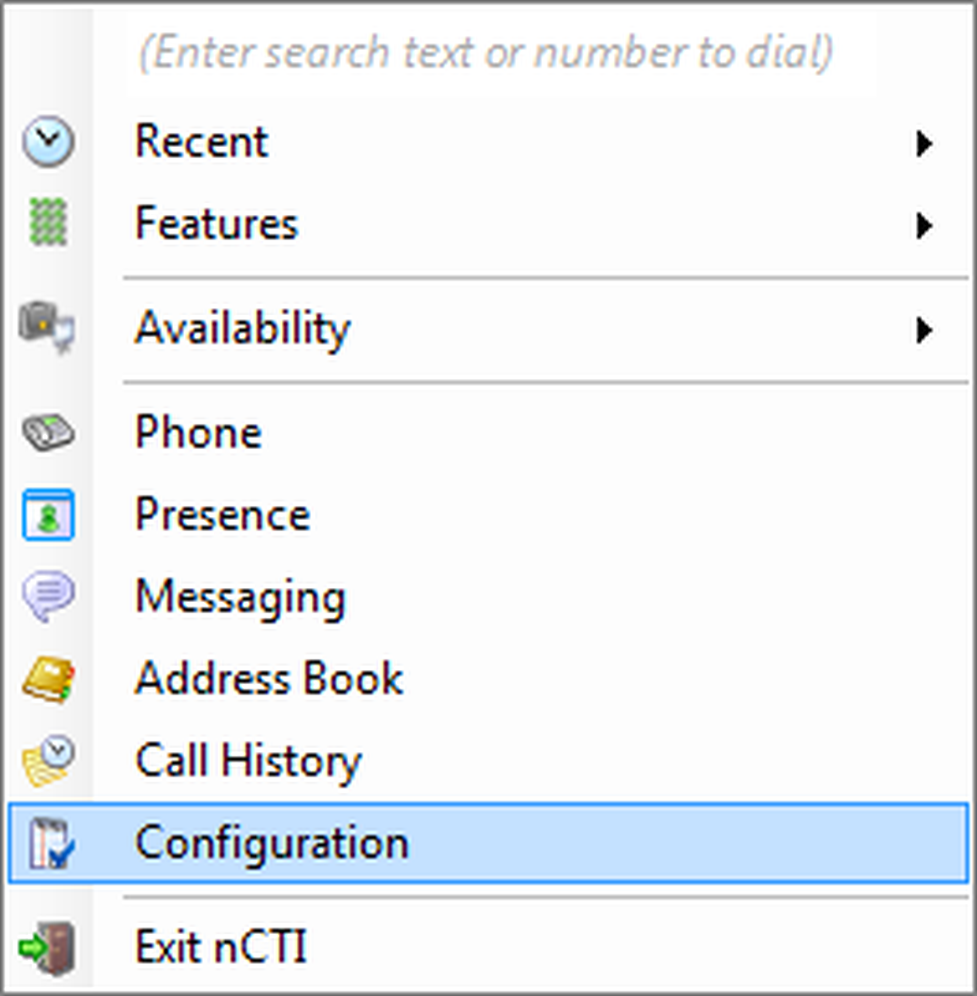
– In order to access your client's configuration settings, right-click on the grey NCTI Premium icon in the menu bar.
Click on Configuration.
⇒ The configuration menu is now open.
Find more detailed information in the Administration Portal Manual.
-As soon as you have entered the data, click on Save.
⇒The client is now connected to your telephone and the icon in the menu bar is green .
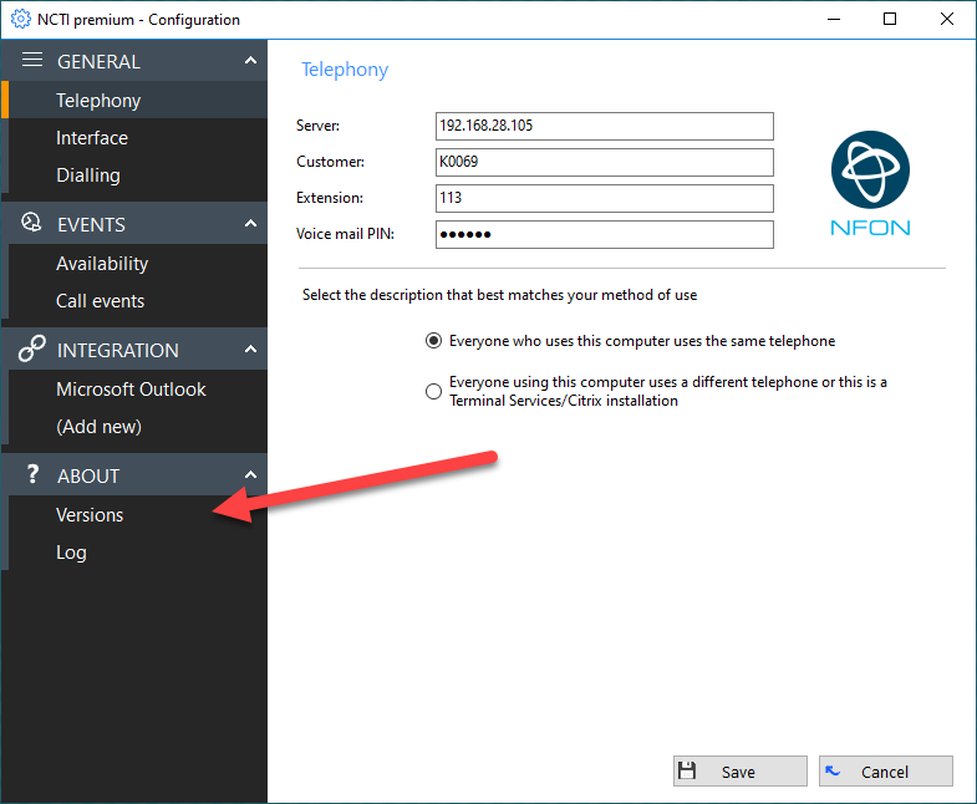
To connect your client with the telephone, enter the following data:
– Server: IP address (e.g. 192.168.30.145) or the domain name of your server
– Customer number: your personal customer number (e.g. K1234)
– Extension number: your personal extension number (e.g. 123)
– Voice mail PIN: your personal voice mail PIN.
– As soon as you have entered the data, click on Save.
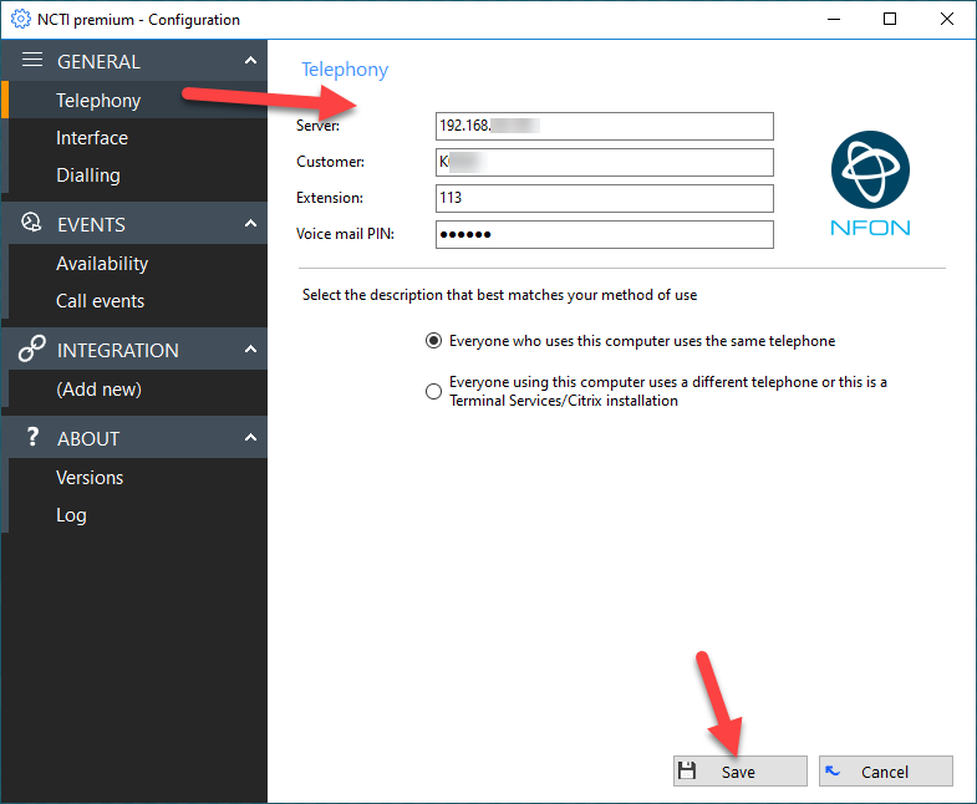
⇒The client is now connected to your telephone and the icon in the menu bar is green.
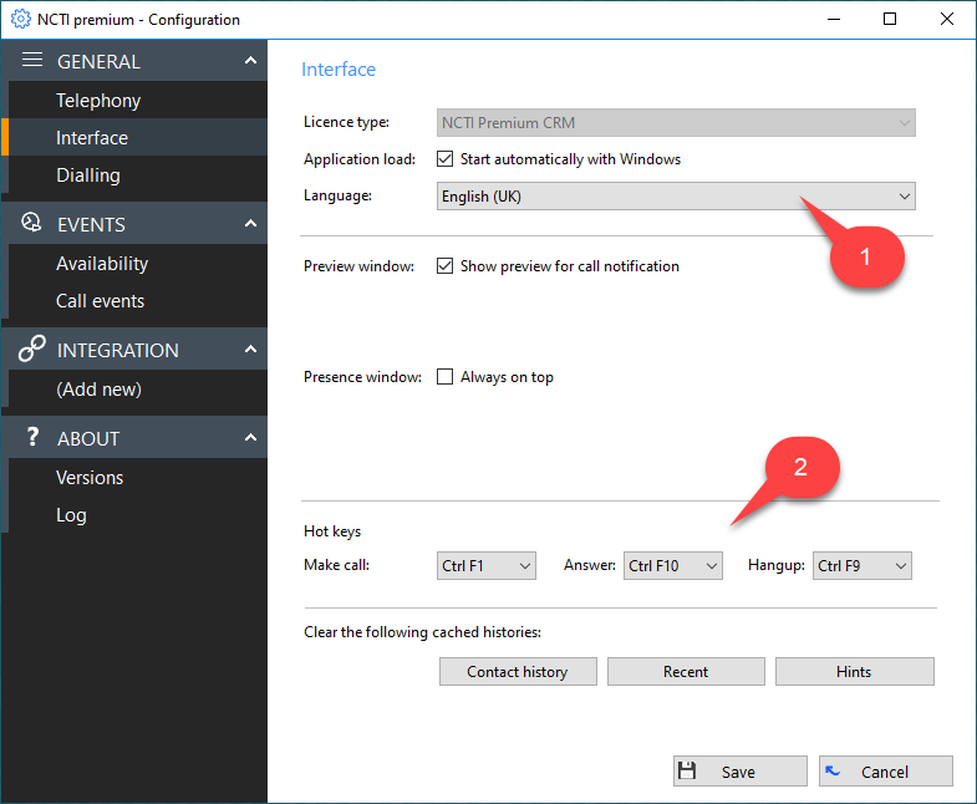
In the user interface folder you can set individual settings for your client.
– Select your language.
– Select the hot keys used for taking calls, dialing, and hanging up.
In the menu Dialing methods you can customise the dialing process.
– You can activate various dialing methods. The settings will only be saved if you press Save.
– Add programmes, such as Outlook, in order to dial directly from the application (more information in Chapter Integration).
– Select the minimum and maximum length of the number that can be recognised from the client. We recommend a minimum length of 5 and a maximum length of 20 characters.
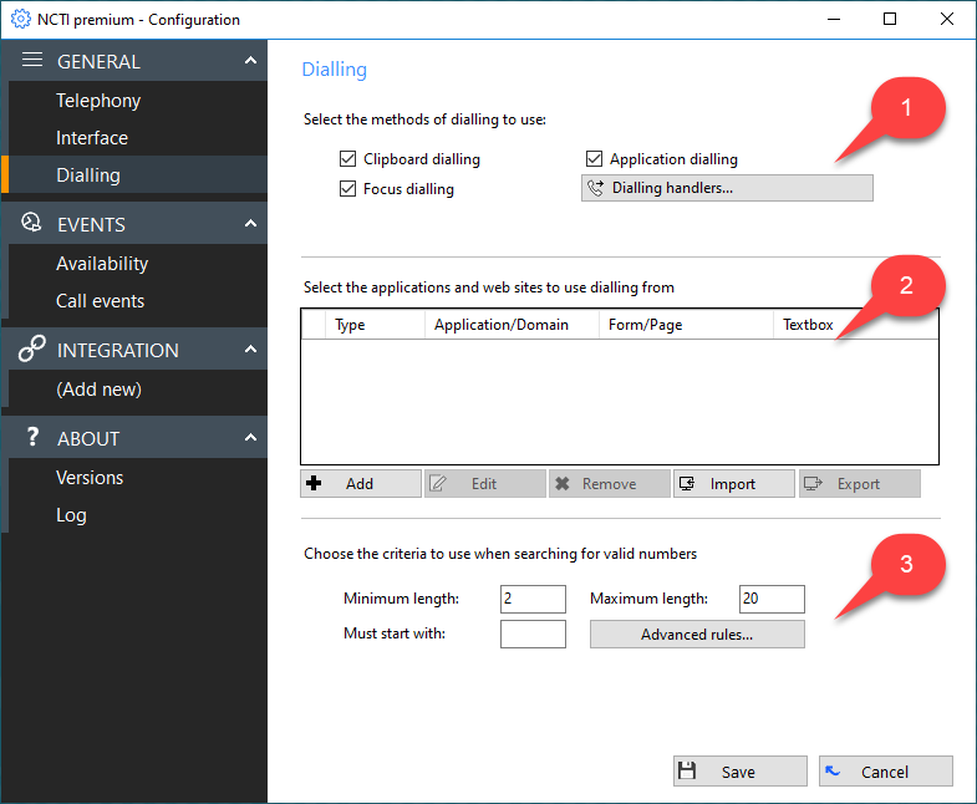
Find more detailed information here.
The different dialing methods are described in greater detail below.
To enable the option to dial from clipboard, right-click on the geen icon in your menu bar. Chose Configuration to enter the administration dialogue.

Click on the Dialing folder. If you choose Clipboard Dialing, a message pops up each time that you marked a number and saved it on the clipboard.

If you click on the pop up, the client starts building up a connection to the number.
- Click on Save to save the settings in your client.
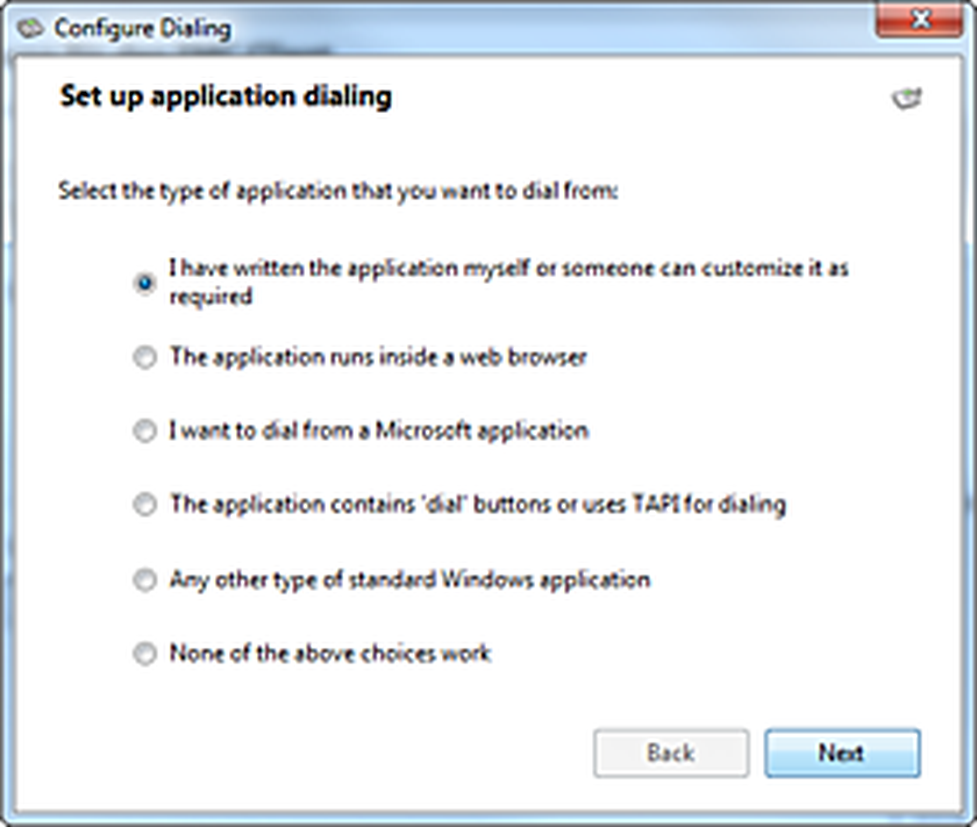
Dialing from an application allows you to directly dial numbers displayed in applications or programs, such as Outlook. The connection to Outlook is shown as an example.
Dialing from application allows you to dial numbers displayed in applications or programs like Outlook directly.
This manual will show the feature's functioning via Outlook.
-To activate dialing from applications, right-click on the green icon in the menu bar to access the administration dialogue
-Click on Configuration and select the Dialing folder.
-Click on Add.

Choose the application type that you whish to dial from.
-Drag the hair cross over to an application that contains a telephone number and release the mouse.
-Click on Next.
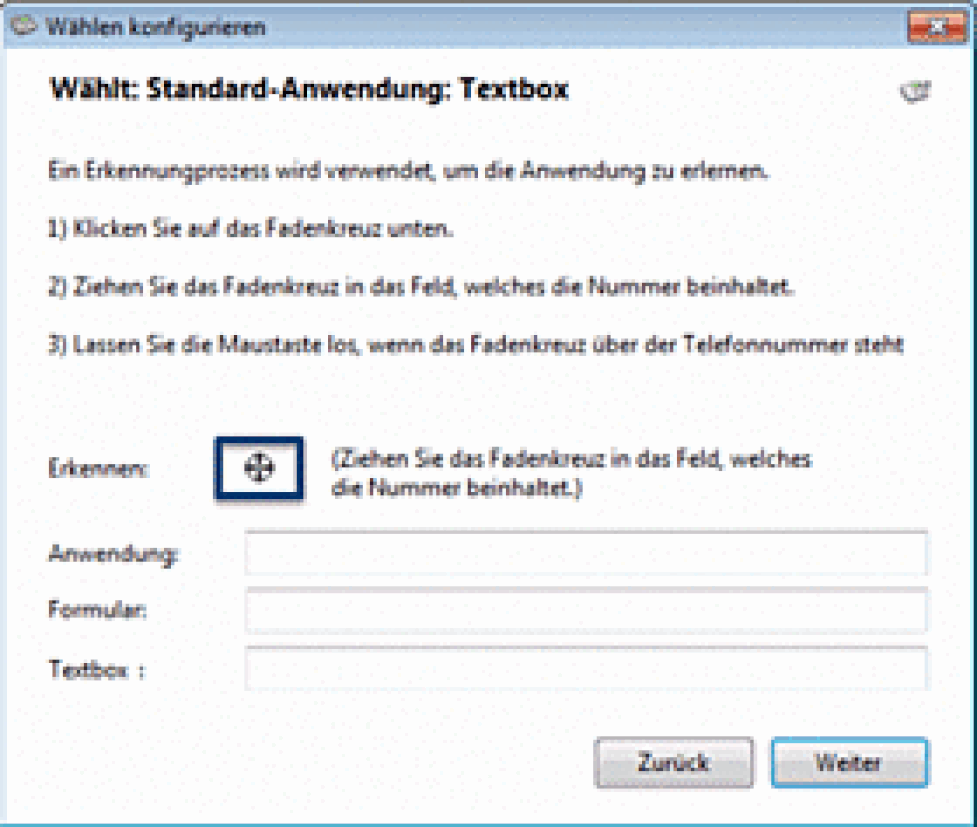
– Click on Close to save your settings.

You are now able to dial numbers from applications.
Example:
-Open a contact in Outlook and click into the field that displays the number.
-Click on the telephone icon.
⇒The client starts to build up a connection.

- Click on Save to save the settings in your client.
Depending on the application, a restart of the computer is necessary in order to use the function.
When Focus Dialing is activated, you can dial numbers from editable fields directly.
-Right-click on the NCTI premium icon and select Configuration to access the administration dialogue.
⇒You can now dial from editable fields.
– Click on the field you wish to dial from.
⇒ The field is now marked in yellow.
– Click on the telephone icon to dial the number.
- Click on Save to save the settings in your client.
If Web page dialing is activated, you can dial numbers displayed in your web browser directly.
-Right-click on the NCTI premium icon and select Configuration to access the administration dialogue.
-Check the box Web page dialing.
-Press Save.
When opening your Internet browser the next time, you will be asked to install Telify, an add-on software. This add-on allows you to dial numbers directly from websites.

After successfully adding and activating Telify, all telephone numbers in your browser are marked yellow. By clicking on the numbers, you can directly dial from with the NCTI client.
- Click on Save to save the settings in your client.
The NCTI premium / CRM Client has a TAPI interface. With the interface, various internal data bases can be connected.
-To activate dialing from TAPI, right-click on the green icon in the menu bar to access the administration dialogue.
-Click on Configuration and select the Dialing method.
-Click on Add.
- Click on Save to save the settings in your client.
With the function Events, the call management can be designed more effectively.

Standard Events
Chose whether a pop-up should be shown in the event "on ringing", "on answer", and "on outbound".
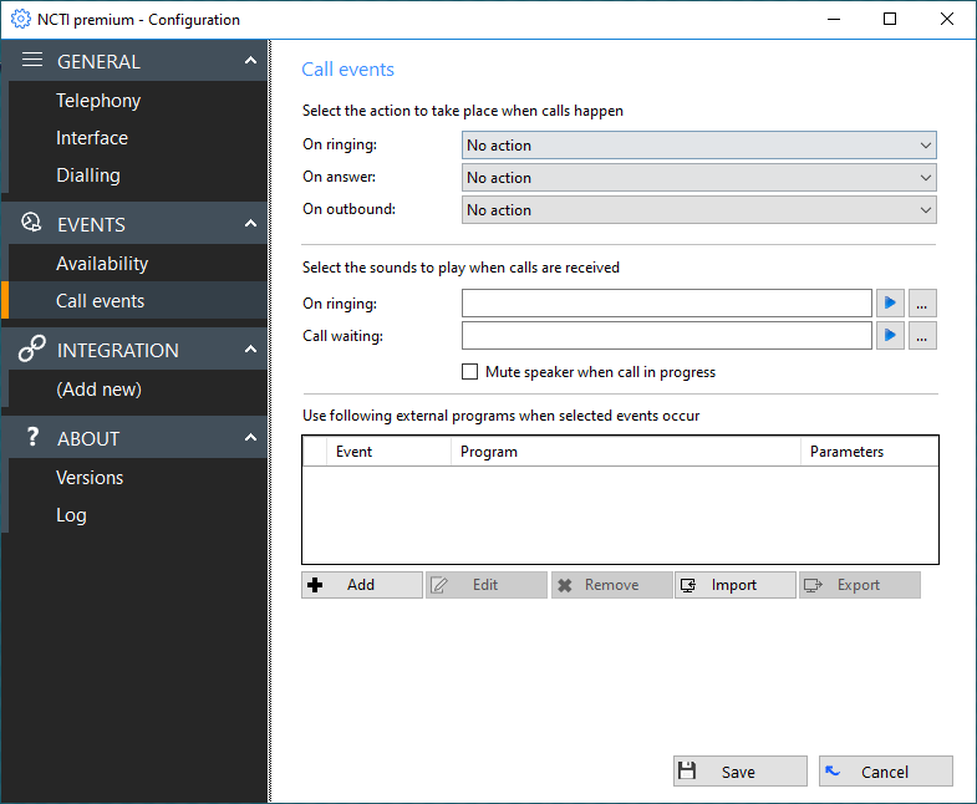
The pop-up displays the number and contact dates of the caller during the incoming call.
Skype for Business Integration
There is the opportunity to connect Skype for Business with the NCTI premium / CRM client. Presence information of your Skype for Business connections will be displayed in the pop-up.
Incoming and outgoing calls change the presence information in Skype for Business automatically. Dialing from Skype for Business is not possible.
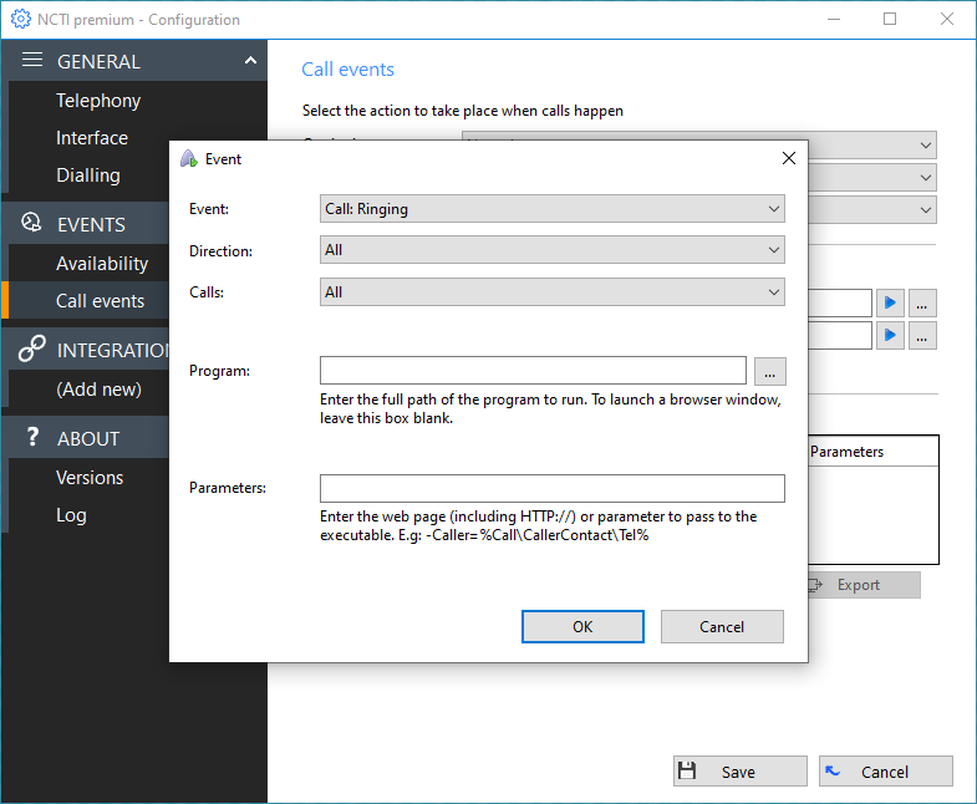
Individual Events
If you would like to set an individual scenario, click on Add.
There is further the possibility to integrate a web-based CRM tool (e.g. Salesforce) into the CTI client. As soon as a call comes in, a browser window opens up. If your CRM tool can deliver URLs with specific parameters, these can be translated into codes in order to transfer the number and name of the calling participant to the CRM application. Once configured, you can access the information anytime.
Example: Using Google as CRM tool
Program:
Select the browser in your application list.
Parameter:
To have the search key "word" displayed on Google, the URL has to be written like this:
"http://www.google.com/search?q=word"
In order to use Google as your CRM tool, enter the following URL:
"http://www.google.com/search?q=%Call\CallerContact\Tel%"
"Word" was replaced by "%Call\CallerContact\Tel%". For future calls, „%Call\CallerContact\Tel%“ will be replaced by the contact's telephone number.
⇒ The configuration panel appears.
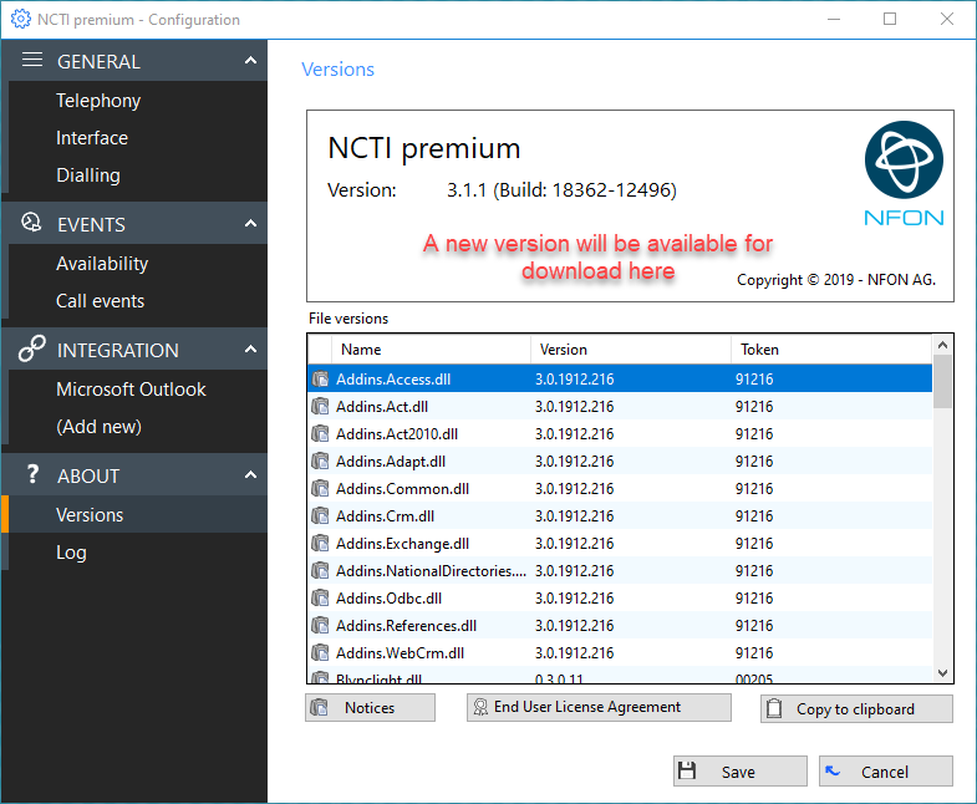
– Open the configuration panel by right-clicking on the NCTI premium symbol in the tray.
⇒ The configuration panel appears.
– Click on "Versions" within the "About" section.
If a new version is available, click the "Download" button in the vonfiguration window to download the latest version of the NCTI Premium.
As soon as the latest NCTI premium version has successfully uploaded, please press the button "Update". The user planning to install the program must have the administration rights to the computer.
Subsequently, the installation process starts. Follow the instructions displayed on your screen to install the latest NCTI premium version.
Your NCTI premium version is now up-to-date.
- Please click on the "Download" Button in the configuration panel.

Subsequently, the download procedure of the latest NCTI premium version starts. This may take a few minutes.

- As soon as the latest NCTI premium version has successfully uploaded, please press the button "Update". The user planning to install the program must have the admin rights to the computer.

Subsequently, the installation process starts.
- Follow the instructions displayed on your screen to install the latest NCTI premium version.

Your NCTI premium version is now up-to-date.

No content available.
There are various telephony functions available at the NCTI premium / CRM Client. To open the telephone window, right-click on the green icon in the menu bar  .
.

– Select "Make a call".
⇒ The telephone window pops up.
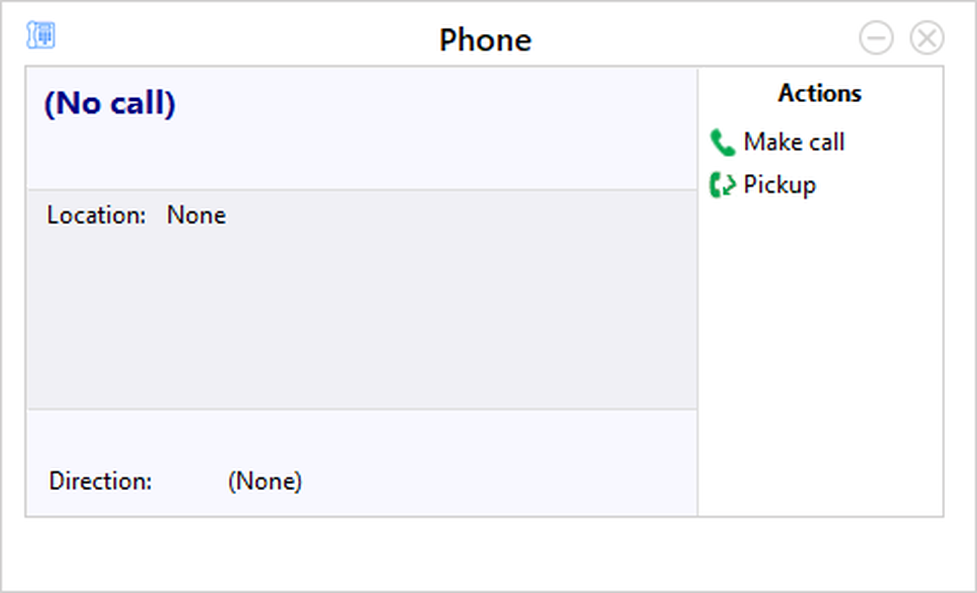
– You can reaccess the client's menu by rightclicking on the top left button of the window.

Starting the application and standby
– Ensure that network and Internet connection are stable. Start the application.
⇒ The application starts in minimized format in the menu bar.
⇒ After registration at the telephone system, the NCTI premium/CRM client will be signalized with a green icon in the menu bar.
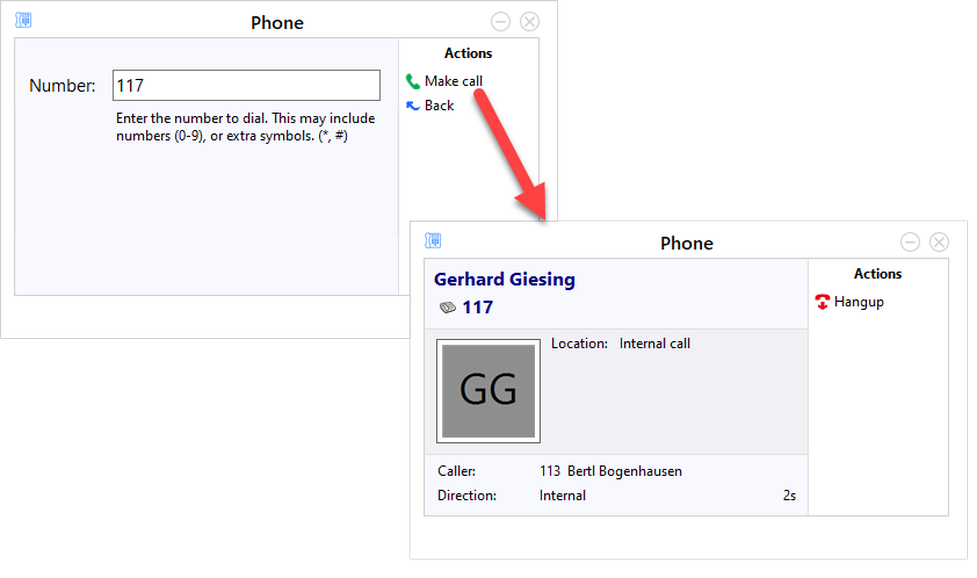
Outgoing call
– For internal calls, enter the extension and click Make call.
– For external calls, enter the telephone number and click Make call.
– To end the call, click on Deflect.
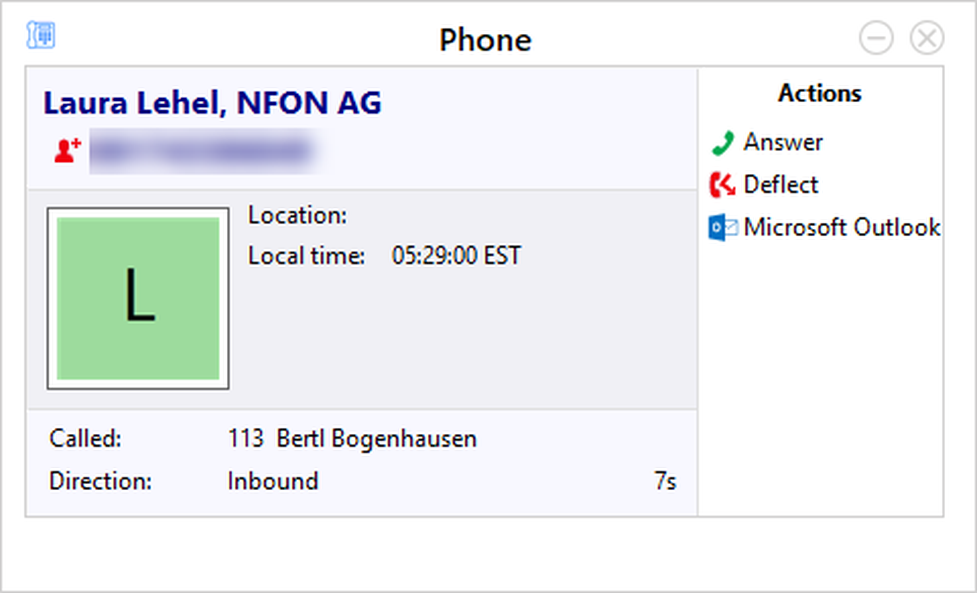
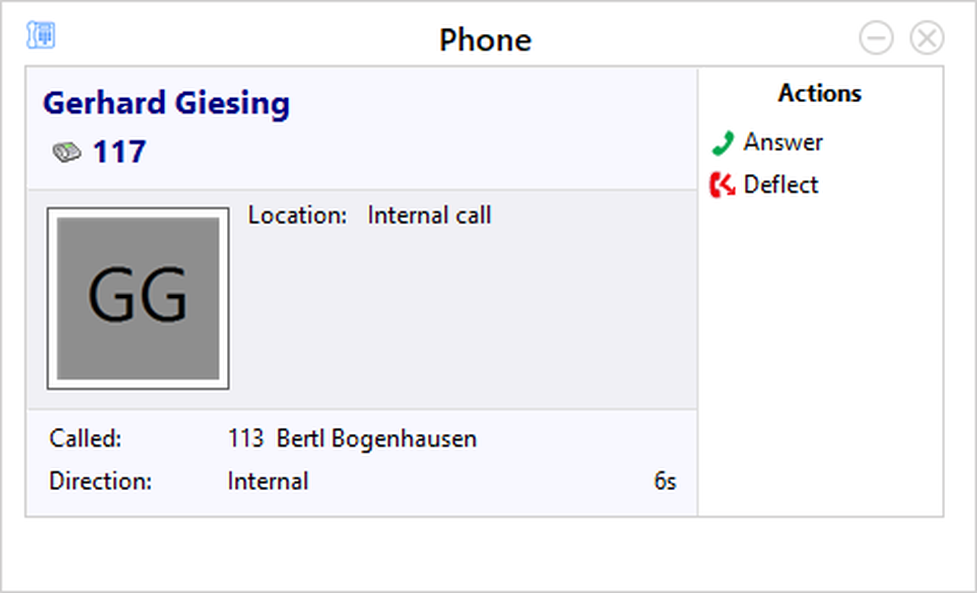
Incoming call
Incoming calls are signalized by a telephone window on the screen.
– To answer the call, pick up at the telephone directly or click on Answer.
– To end the call, click Deflect.
If you do not want to be disturbed, you can change your availability with the presence management.
Find more information here.
During an active call, the telephone window shows various telephony options. The comfort options are described below.
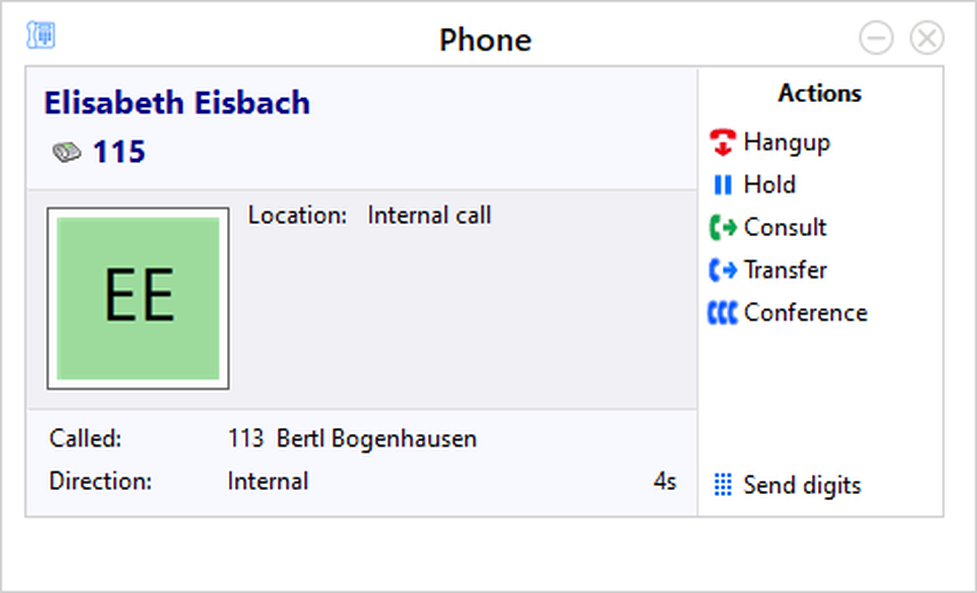
Knocking and toggle
If during an active conversation a second call comes in, a pop-up on screen will show you the caller's information. On the right side of the telephone window action items and two blue arrows will be displayed. The arrows allow you to toggle between calls.
- Hold a call by clicking on Hold. The call on hold is marked with a yellow telephone icon. The active call is marked with a green telephone icon.
- Alternatively, take the second call by clicking on Take the call. The previous call is set on hold.
- To end a call, press Hang up.
Unattended Transfer
After taking a call, you can transfer the call further.
-Click on Connect during an active conversation.
-Enter the telephonenumber you wish to connect to.
⇒The caller will be put on hold.
-Click on Connect to transfer the call. You can now hang up.
⇒The call is directly transferred and your phone is free for other calls.
Attended Transfer and Conference
You took a call. The call is supposed to be transferred and announced to the third party.
– Click on Announce during the active conversation.
– Enter the telephone number you wish to connect to.
– After announcing the caller to the third party, click on Completed.
⇒ After hanging up, the caller will be transfered with an accoustic signal.
– Start a conference by clicking on Conference or activating a conference via the system telephone.
Presence Management enables the user to quickly overview the availability of all participants. Via different icons the presence information of all participants is clearly displayed.
You can access Presence Management by right-clicking on the green icon in your menu bar and selecting the Presence Management menu item.

The Presence Management window pops up afterwards. The surface of the tool is seperated in various parts, containing different information.
Details of the Presence Management window
Sort or group your contacts by department, direction, status, user state, own availability, agent status, place or location. The NCTI Premium Client takes the entries from the server.
| Column from left to right | Description |
| 1 | Extension number |
| 2 | Presence information of your colleagues. |
| 3 | Name |
| 4 | Department |
| 5 | Online / Offline information of the participant |
| 6 | Shows direction of the call (incoming / outgoing) |
| 7 | Availability |
| 8 | User State |
| 9 | Information about Do Not Disturb function |
The status of a colleague is visualised by different symbols depending on his current call status. Here is an overview of the different call statuses/symbols:
| Icon | Description |
| Available | |
| Offline | |
| DND is activated | |
| Participant is performing an outgoing call | |
| | Participant is in an incoming call |
Manage your presence information
Here you have the possibility to manage the presence information that your colleagues will see. Use this when you are in a meeting and want to avoid unwanted internal calls.

Click on the green tick next to your name or extension number.
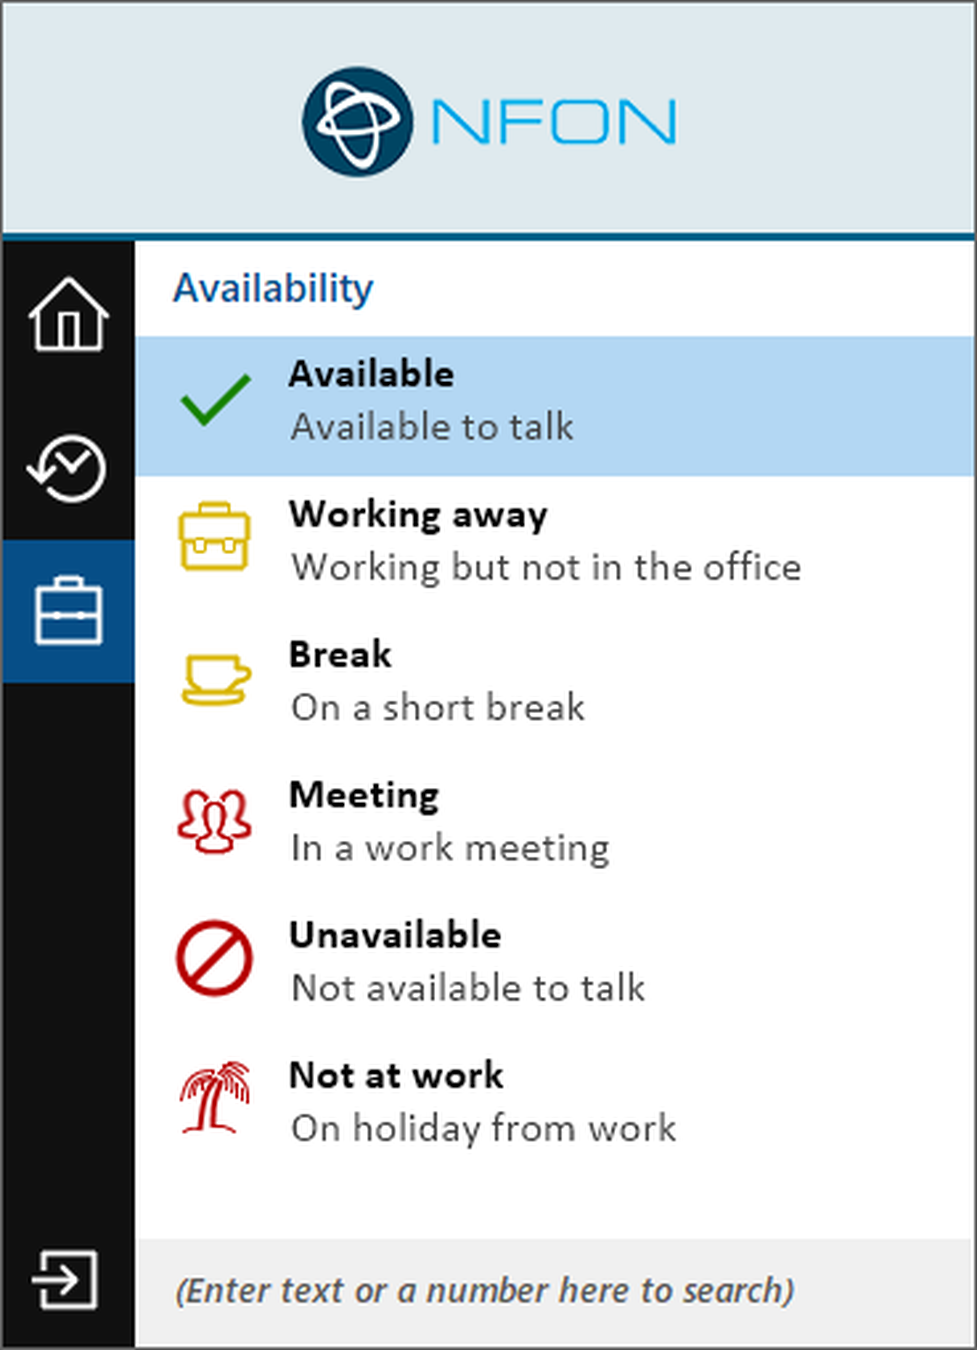
Under Availability you can choose whether you are Available, in a Meeting or Out of Office.
⇒Your colleagues are now informed about your presence information and will not call you unexpectedly.
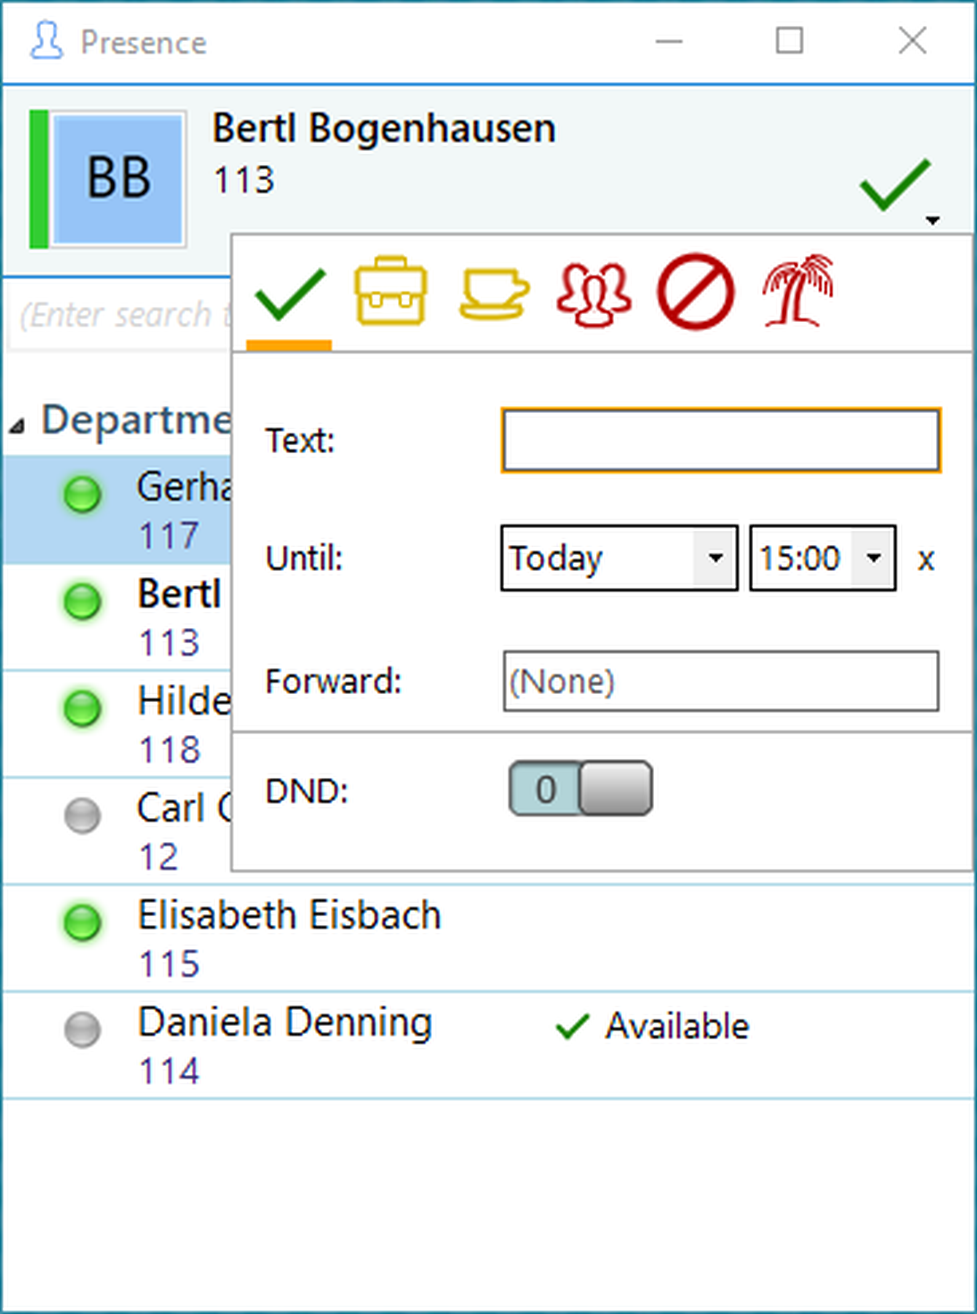
You also have the option of managing your status by clicking on the briefcase under the menu item "Availability".
Further functions
If you right-click on a colleagues presence icon , you have the possibility to call or message the contact.
Click on Make Call to call the Viewcontact.
Send a message by clicking on Send Message.
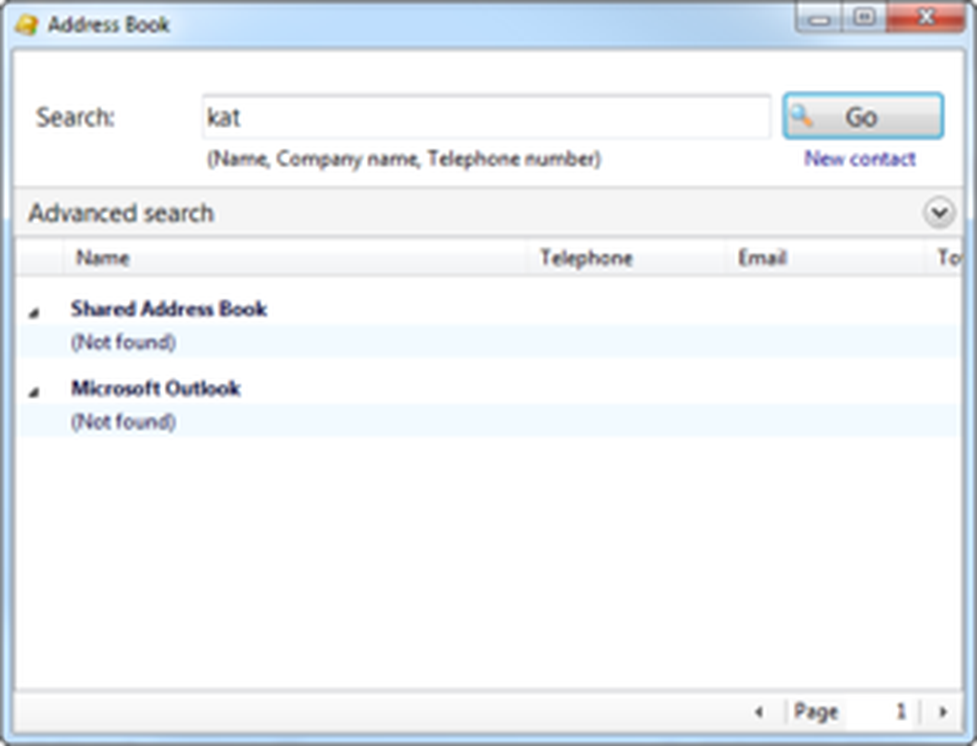
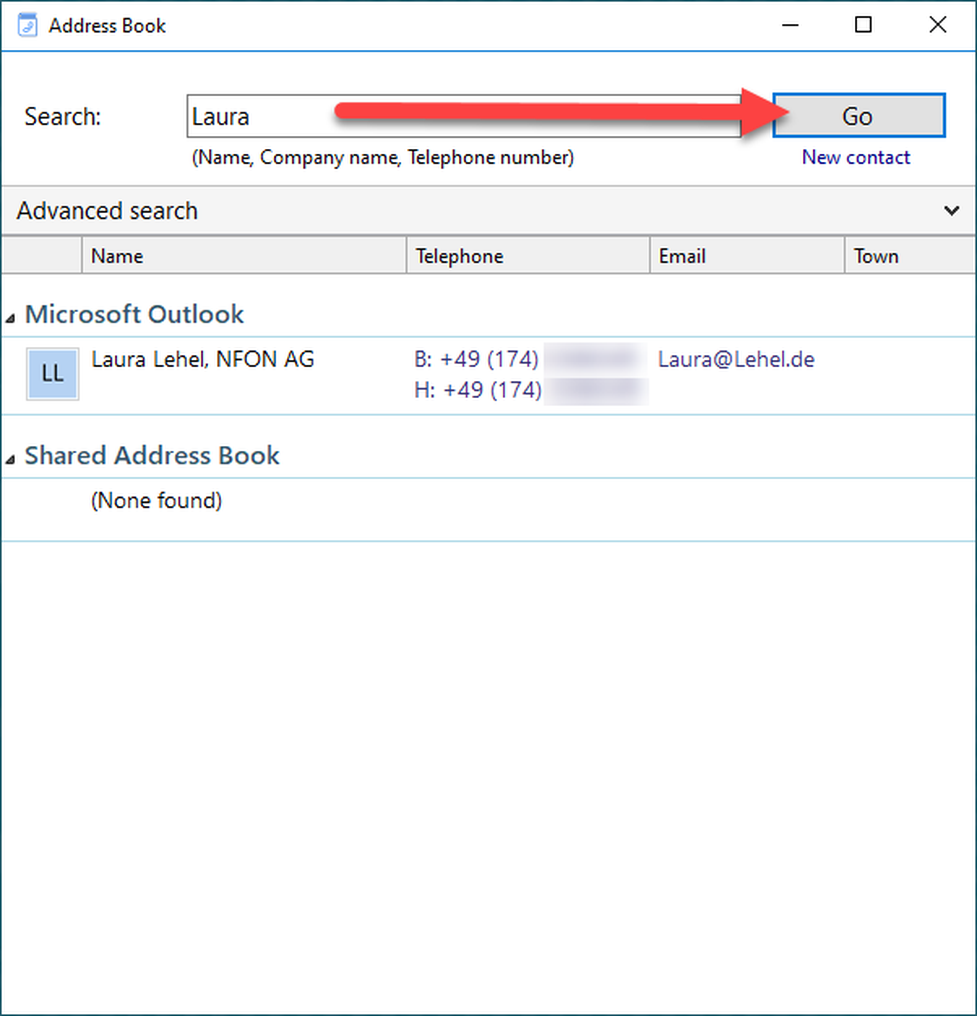
To open the address book of the client, click on the green icon in the menu bar.
In the CRM version of the client, the address book automatically sorts your contacts depending on the CRM system. You will find all contacts of different CRM tools integrated into one directory.
Dial from the address book
You have the possibility to dial contacts directly from the address book.
Right-click on the contact in your address book.
If you click on Dial, the contact's information will be displayed.
By clicking on the telephone number, the call is initiated.

Search function
Enter the contact's name or extension into the search field.
If the contact is saved in several data bases, the contact will be displayed multiple times.
The call history shows your incoming and outgoing calls. It is an overview of all calls and people you have been in contact with lately.
To access your call history, right-click on the green icon in the menu bar and click on Call History.
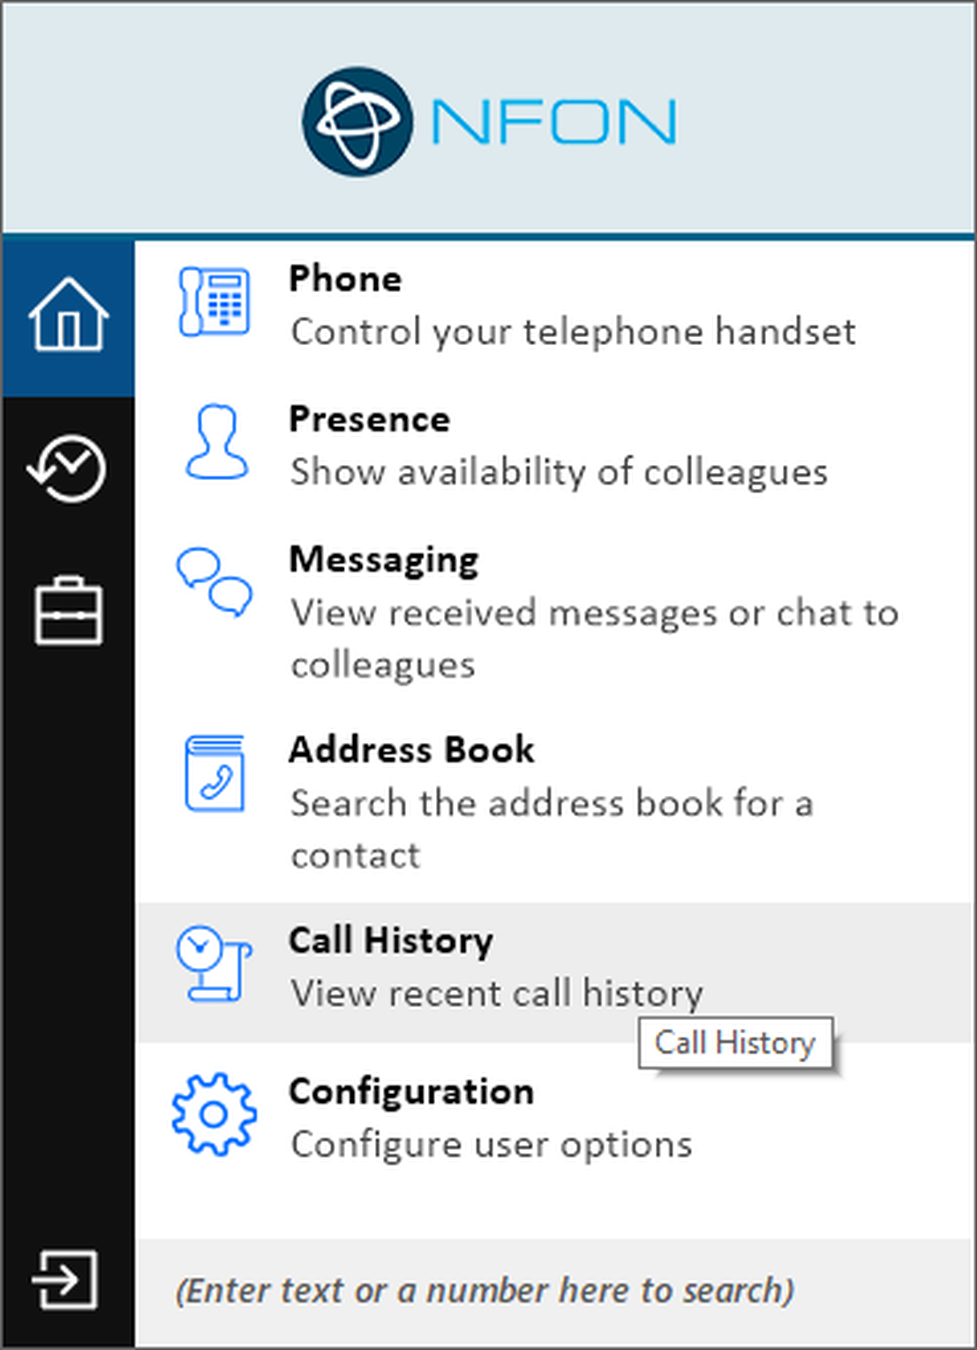
⇒ Your call history will be displayed.
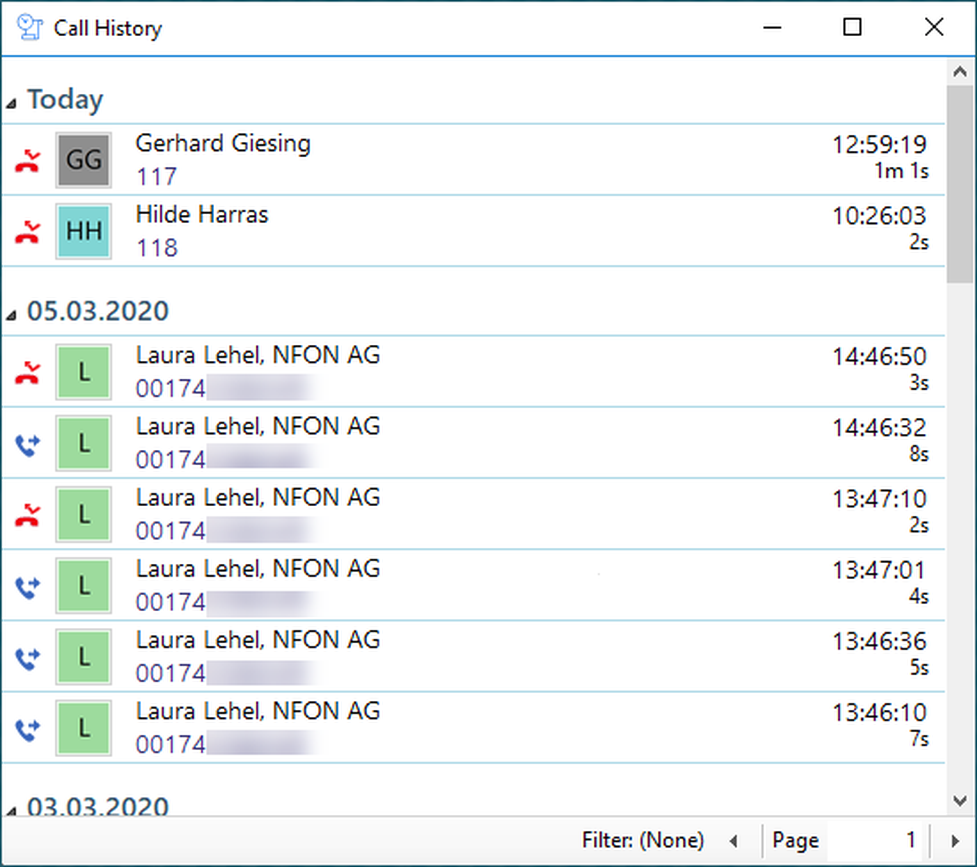
Call activities are displayed by various arrow icons.
| Icon | Description |
| | taken incoming call |
| | missed incoming call |
| | outgoing call |
| | outgoing call not taken by the other party |
You further have the possibilty to set various filters.
- Click on Filter in the Call History.

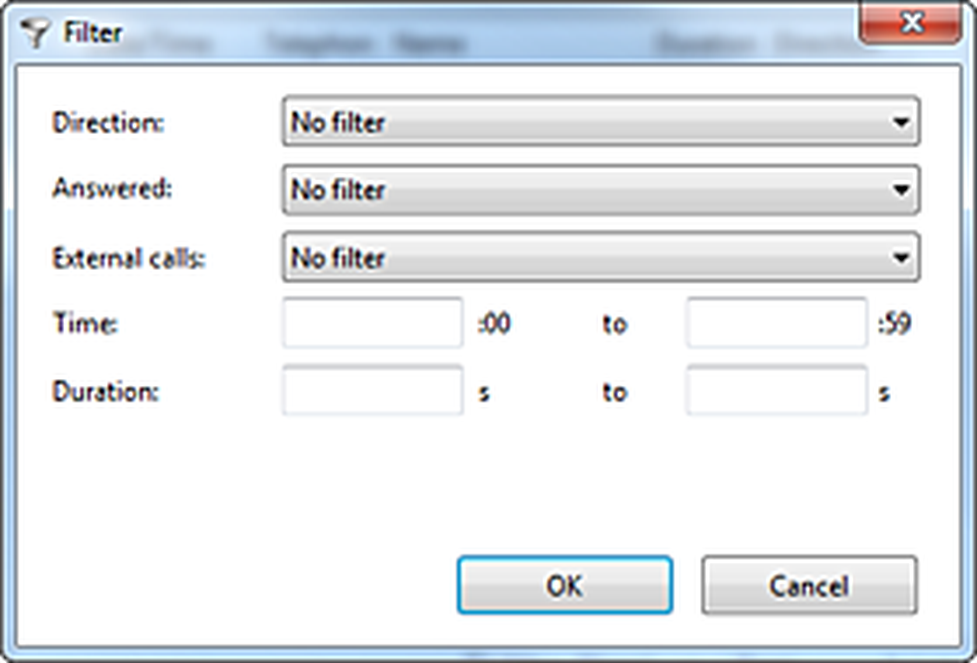
| Filter name | Description |
| Direction | Choose between incoming and outgoing calls. |
| Answered | Choose between taken and untaken calls. |
| Extern calls | Choose between internal and external calls. |
| Time | Show only calls of a certain time span. |
| Duration | Show only calls of a certain duration. |
Send call details via email
Follow these steps to transfer missed call details to another person via email:
-Mark the call in the call history.
-Press CTRL+C and open an email.
-Press CTRL+V to add the call details to the email.
The messenger function enables the user to share informatoin without blocking the telephone line. You can interact with other peers even when being on the phone.
Access the messenger function via right-click on the green icon in the menu bar.
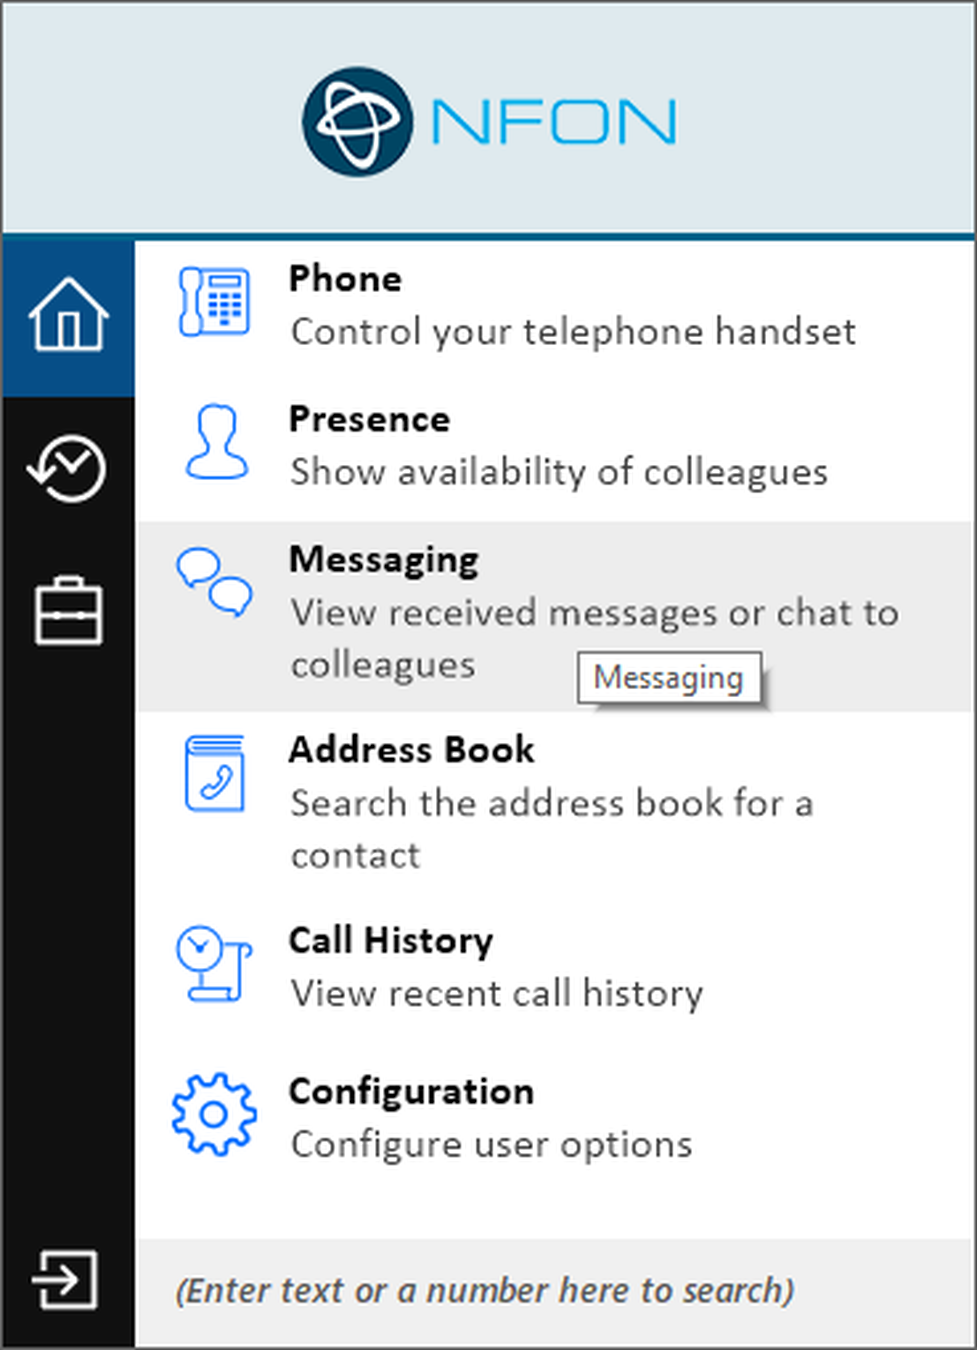
⇒ The messenger window opens.
Click on New message to start a conversation.
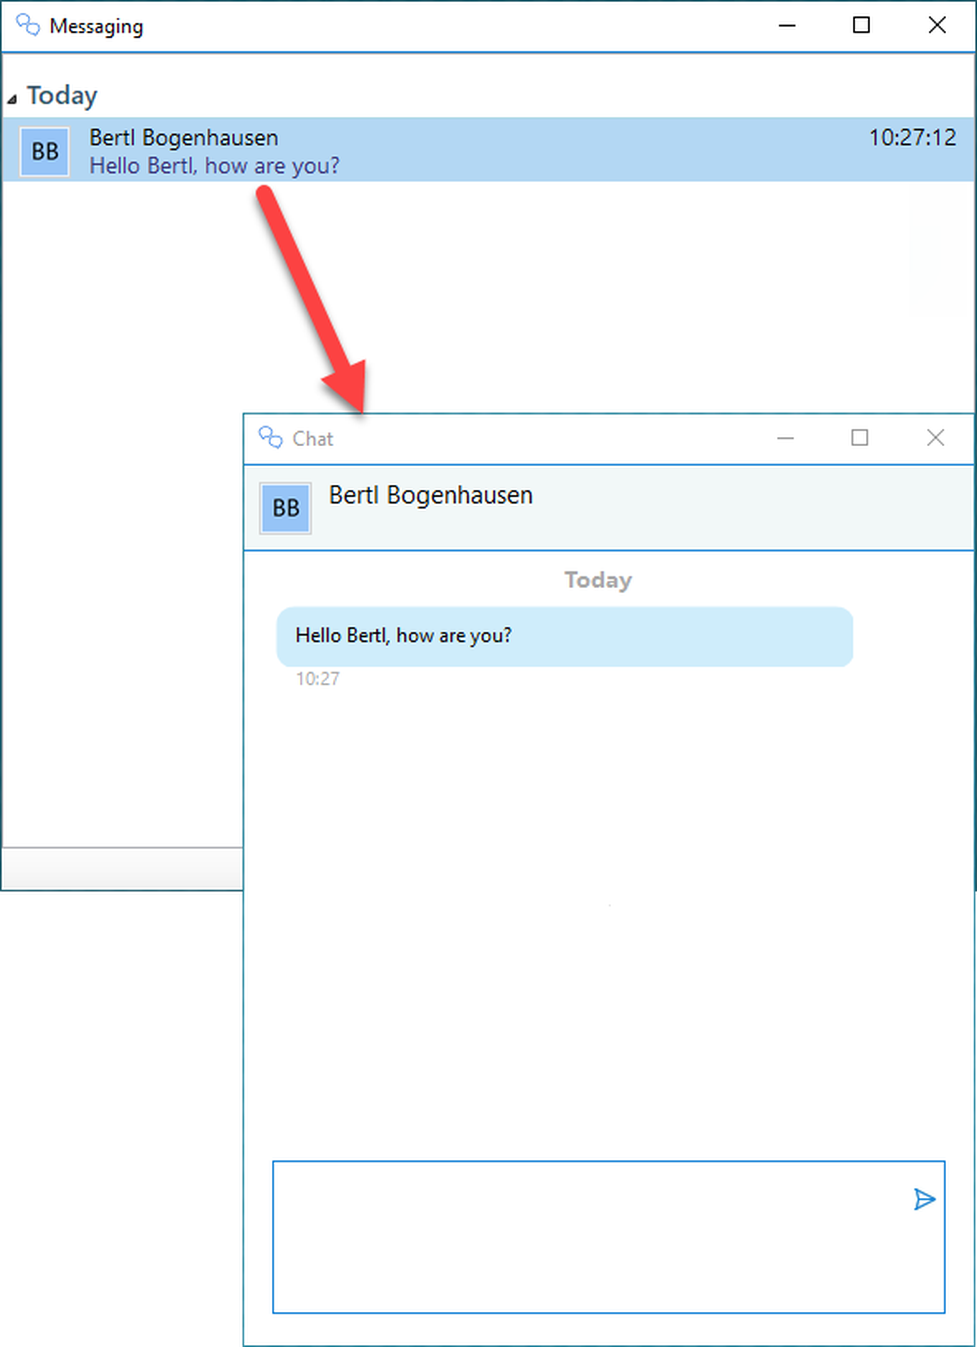
Incoming messages will be displayed with a screen pop up on your desktop.
Click on Answer to open the dialogue and answer the message.
No content available.
Integration into modified CRM systems upon request.
The NCTI premium CRM Client allows for the integration of various customer relationship management tools (CRM systems), such as Hubspot, Salesforce, Zoho and many more. The functions ‘Caller Preview’, ‘Contact Popping’, ‘Contact Searching’, ‘Actvity Logging’ and ‘Click to dial’ are available for these CRM systems.
The scope of services varies depending on the CRM system and is well documented in each case (e.g. DATEV). Basically, the CRM systems differ in their respective ‘Add-in Classification’, which is described in detail on the overview page.
If a CRM system is missing, a ticket can be created for the integration. Custom integrations make it possible to integrate over 200 additional systems.
The integration enables for connecting contact databases to your CTI client.
The integration of CRM will be displayed with Outlook and Salesforce on the following pages.

Integrate local Outlook contacts into your telephone system with the NCTI premium CRM client. It gives you more information for incoming calls, thus optimizing work process and increasing productivity at the work place.

- Right-click on the green icon in your menu bar and choose Configuration to access the administration dialogue.
- Click on (Add new) in the Integration section.
- To activate Outlook, select Microsoft Outlook from the list and click on Save
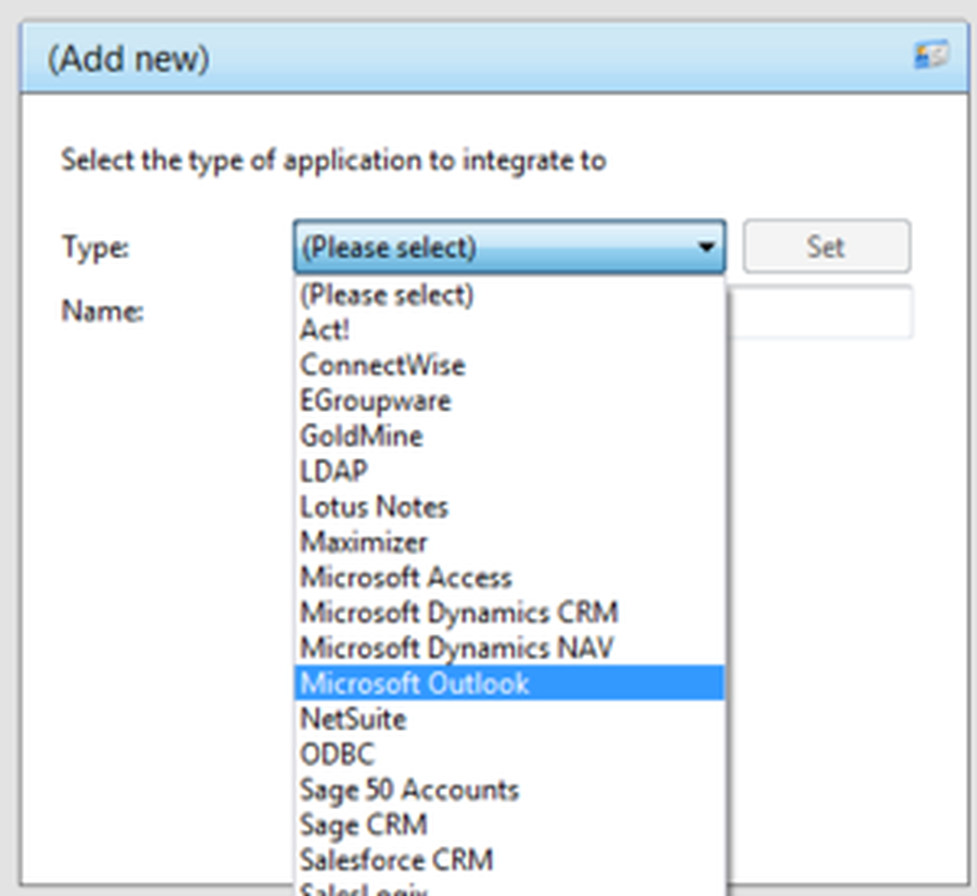
The NCTI premium CRM client will only synchronize with Outlook after a restart of the client!
Incoming call
If a contact from your Outlook adress book is calling you, the contact details will be shown in a pop up as soon as the call is initiated. Furthermore, the data is displayed in the telephone window.
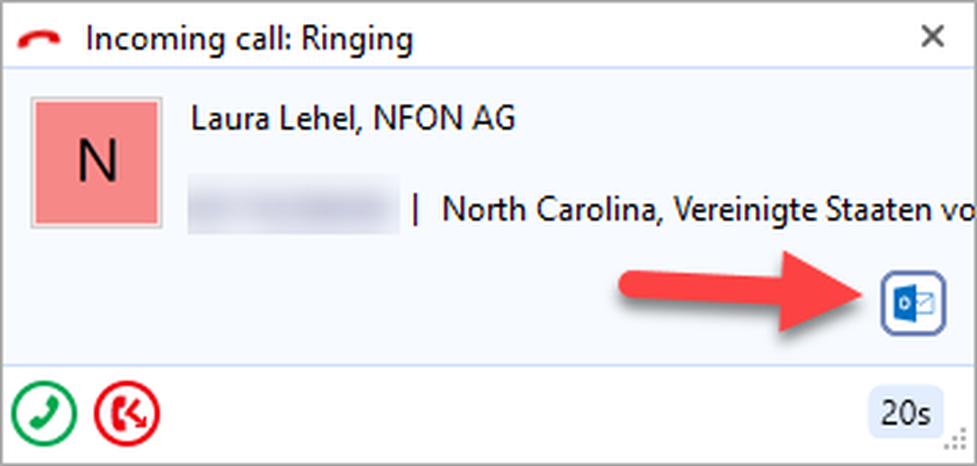
Click on the Outlook symbol ![]() to access further information of your contact from Outlook and to take or read notes about the conversation.
to access further information of your contact from Outlook and to take or read notes about the conversation.

Salesforce Plugin of NCTI premium works with the following Salesforce editions only:
The NCTI premium CRM client enables you to integrate your Salesforce contacts into the telephone system. This allows for upfront information about the contact optimizing work processes and enhancing productivity on the work place.
Right-click on the green icon in your menu bar and select Configuration to access the administration dialogue.
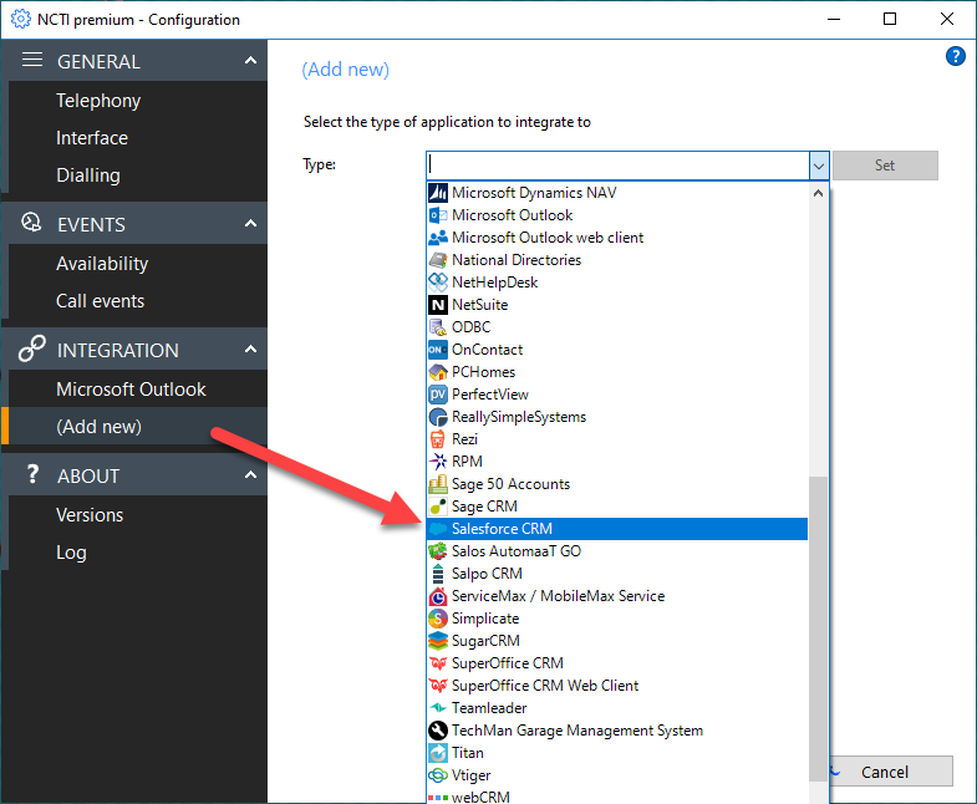
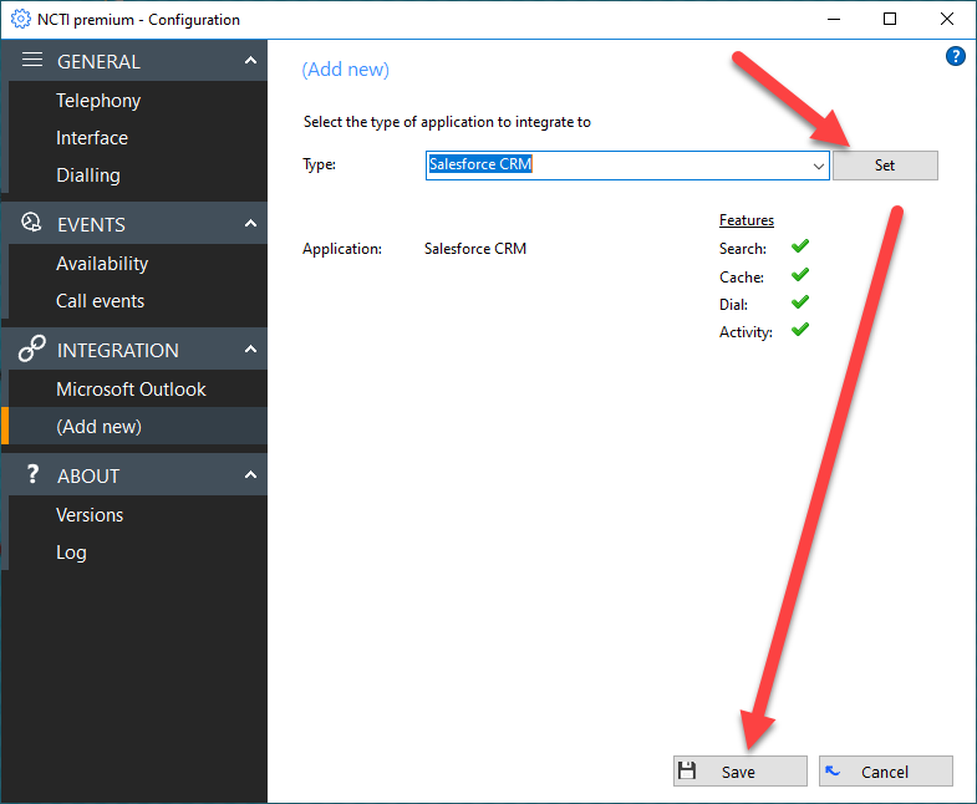
Activate Salesforce by clicking on (Add new) in the Integration section. Select Salesforce CRM in the Type dropdown.
Add Salesforce and klick on Save.
Configuration dialogue
Then you need to configure the Salesforce integration. Follow steps 1–4 on the screenshot.
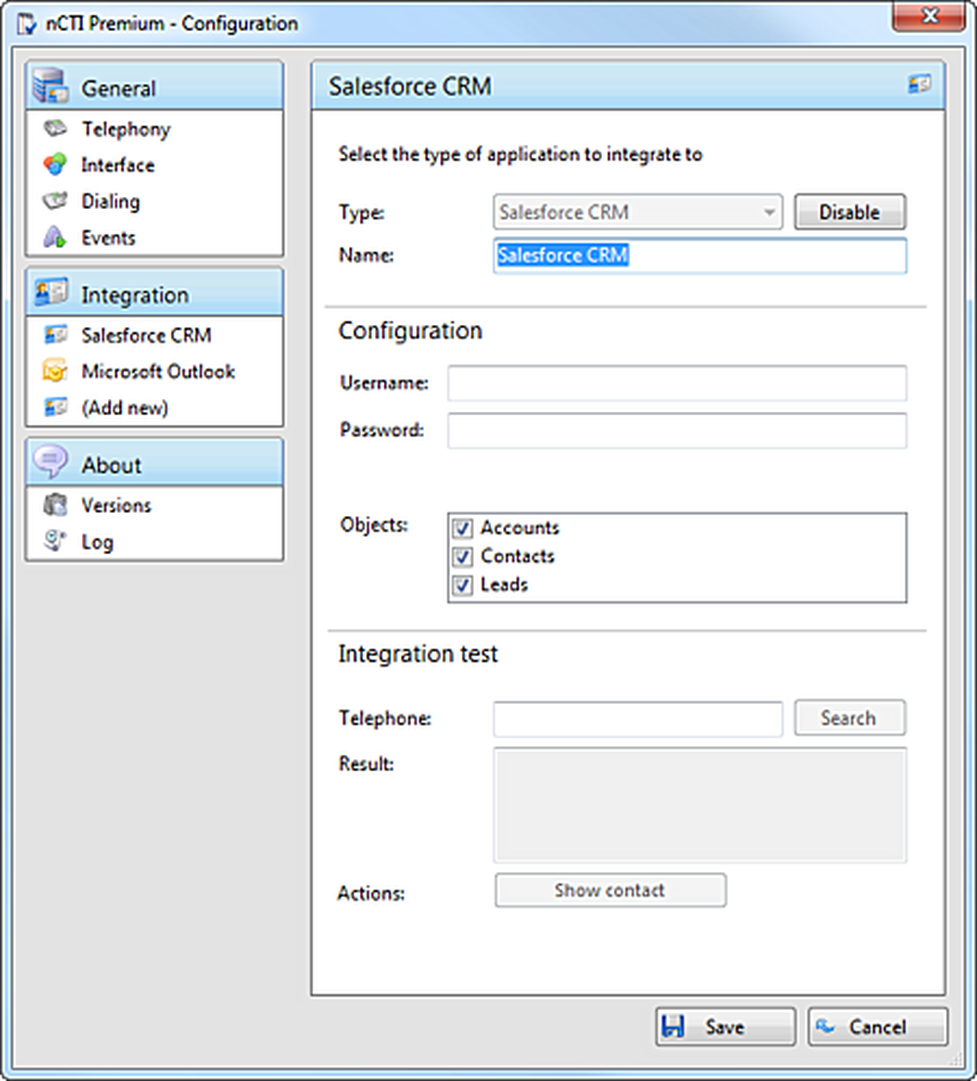
| Section | Description |
| Username Password | Enter your Salesforce username and password (password + security token) |
| Object | Choose which kind of information you would like to have displayed and check the desired information. |
| Telephone | Enter a telephone number to start an integration test. If successful, information will be displayed in the lower field. |
| Save | Click on Save to validate the settings. |
Where can you get help?
You can use various sources for help concerning your issues. Please use them in the order suggested here:
| NFON AG | Zielstattstraße 36 81379 München Tel.: + 49 89 45 3000 www.nfon.com |
| nfon.com | At nfon.com under Service you can find an overview of all documentation, downloads, blogs and portals as well as help pages and further information. For any feedback to documentation, please contact redaktion@nfon.com |
| portal.nfon.com | The home page of the service site contains various links to manuals, brief instructions, software downloads and templates. Please read these manuals thoroughly. They help you get the most out of your telephone system. |
| support.nfon.com | The NFON AG support website contains detailed FAQs with valuable information pertaining to your telephone system. You can always check the status of your support inquiries and respond to further inquiries. |
| Support hotline for existing customers | If neither the manuals nor the FAQs or other contents of the support website provide a solution, you can open a support ticket by phone. If neither the manuals nor the FAQs or other contents of the support website provide a solution, you can open a support ticket by phone.
|
| Support hotline for test customers | Test customers are routed to a service hotline tailored to their specific needs. Our staff for this hotline is available Monday to Friday from 9 am to 5 pm at +44 20 3740 6740 for UK and +49 89 45 300 553 for Germany. Unfortunately, we are unable to provide support for test customers outside of these business hours. |
| | Support for German customers: portal.nfon.com ~ support.nfon.com ~+49 800 63 66 555 |
| | Support for customers in the UK: portal.nfon.com ~ support.nfon.com ~ Hotline +44 20 3740 6740 |
| | Support for customers in Austria: portal.nfon.com ~ support.nfon.com ~ Hotline +43 2742 7 55 66-555 |
| | Support for customers in France: portal.nfon.com ~ support.nfon.com ~ Hotline +33 01 88 45 38 00 |
| Support for customers in Italy: portal.nfon.com ~ support.nfon.com ~ Hotline +39 02 99749 920 | |
| Support for customers in the Netherlands: portal.nfon.com ~ support.nfon.com ~ Hotline +31 88 938 2444 |